
Kasten k10 多云适配系列 09 - 利用 Kasten K10 保护 VMware Tanzu TKGs 云原生应用
1. 背景
常常有人问我,为什么 K8S 有那么多的分发版本? 其实每一个 K8S 的分发版本都有他自己的特色,企业在选用 K8S 的分发版本时,就像选择以下的几个杯子,马克杯、咖啡杯、运动水壶,它们都有不同的使用场景。在过去我们讨论 VMware 时,更多的场景为它是专业的承载虚拟机运行的平台,在虚拟机上安装操作系统、再部署应用,好象是 IT 世界一直重复的进程。但从应用的本质上来看,应用程序架构正在象着不可变基础架构与基础架构即代码的方式转移。企业需要运行的应用系统不再由虚拟机提供、服务、记录和呈现,而是由 Kubernetes 直接提供服务。Kubernetes 引入了他的优秀的框架,包括支撑新型应用的 Serverless 方式。
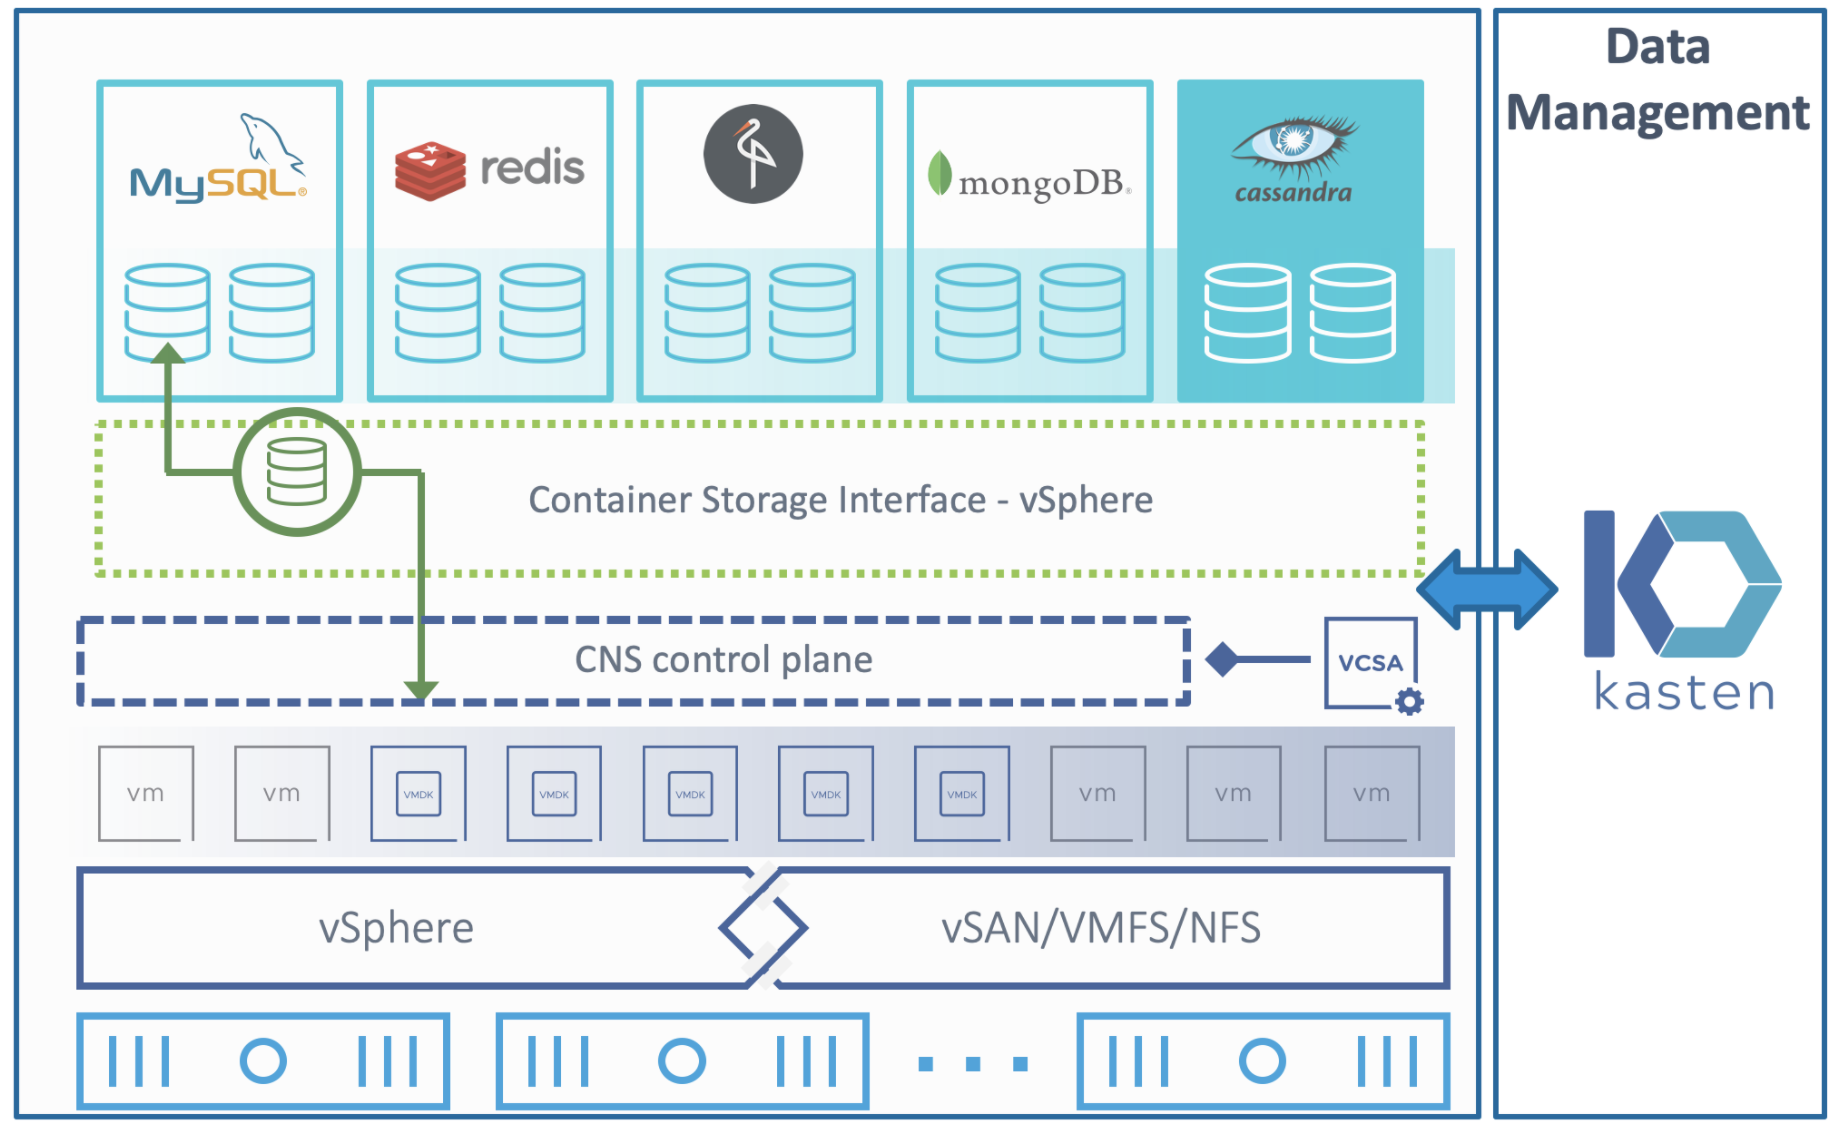
通过 Project Pacific 开源项目,VMware 将 Kubernetes 深度集成到 vSphere 中,以支持现代应用程序开发和运营。Kasten K10 专为 Kubernetes 构建,提供关键数据管理功能,包括应用程序灾备、备份和迁移。Kasten 作为 VMware 的数据管理设计合作伙伴,让企业运维团队能够在这个云原生时代无缝保护其不断增长的 Kubernetes 应用程序。
这篇文章深入探讨了如何利用 Kasten K10 保护 VMware Tanzu Kubernetes Grid (TKG) 云原生应用程序,这将包括备份和移动性,喝杯咖啡,让我们开始吧!
2. Kasten 与 VMware Tanzu TKGs
Kasten K10 是 Veeam 在 Kubernetes 平台的数据管理解决方案,通过部署 Kasten K10 企业可以安全地备份和还原、执行灾难恢复以及迁移云原生的应用。Kubernetes 集群资源和持久卷等存储资源。解决用户备份、灾难恢复、迁移过程中的数据管理问题,提高云原生环境数据管理的便捷性,帮助用户降低灾备成本,提高生产执行效率。
Tanzu Kubernetes 集群是由 VMware 构建、签名和支持的开源 Kubernetes 容器编排平台的完整分发版。可以通过使用 Tanzu Kubernetes Grid 服务在主管集群上置备和运行 Tanzu Kubernetes 集群。主管集群是启用了 vSphere with Tanzu 的 vSphere 集群。
2.1 使用 Kasten K10 和 VMware 解决数据管理问题
Kasten K10 数据管理软件平台专为 Kubernetes 打造。作为数据管理的 VMware 设计合作伙伴,K10 可以与 vSphere 跨 TKG 和其他 Kubernetes 发行版无缝部署。K10 以应用程序为中心的方法以及与关系数据库和 NoSQL 数据库以及包括 VMware Cloud Native Storage (CNS) 在内的存储系统的深度集成为您的整个 Kubernetes 应用程序提供备份/恢复和移动性。K10 以操作简单为核心宗旨,让Kubernetes 应用移动和备份变得像 1-2-3 一样简单。
3. 验证目标
在本次验证场景中,我们将结合 VMware Tanzu TKGs 容器存储解决方案保护云原生应用的方式。
- 登录 Tanzu Supervisor Cluster
- 创建 Workload Cluster
- 创建 云原生应用
- 安装 Kasten K10 到 workload cluster
利用 K10 对存储 CNS API 进行调用生成快照,达成最快速的 RPO 与 RTO的备份与恢复
利用 MinIO 对象存储,将快照数据导出到对象存储桶上,实现了异地容灾与数据长期保留
达成效果:
利用 CNS CSI 快照,在本地 Kubenetes 环境,云原生应用的快速备份与恢复(利用CSI快照)
利用 MinIO 对象存储,在本地形成长期保留
利用 Kasten K10 直接将数据容灾到远端,或利用 MinIO 对象存储实现存储桶的复制,实现 3-2-1-1-0 的数据保护。
3. VMware Tanzu TKGs 配置 workload Cluster
3.1. 登录 Tanzu Supervisor Cluster
❯ ./kubectl-vsphere login --server=10.172.69.66 --tanzu-kubernetes-cluster-name tkg-prod --tanzu-kubernetes-cluster-namespace prod --vsphere-username administrator@vsphere.local

KUBECTL_VSPHERE_PASSWORD environment variable is not set. Please enter the password below
Password:
Logged in successfully.

You have access to the following contexts:
   10.172.69.66
   cls-18wcjlo3-100006537440-context-default
   dev
   prod
   tkg-prod

If the context you wish to use is not in this list, you may need to try
logging in again later, or contact your cluster administrator.

To change context, use `kubectl config use-context <workload name>`

~/Downloads/bin 22s
❯ kubectl config use-context prod
Switched to context "prod".
3.2. 创建 Workload Cluster
3.2.1. 创建 Workload Cluster 的 yaml 文件
apiVersion: run.tanzu.vmware.com/v1alpha2
kind: TanzuKubernetesCluster
metadata:
name: tkg-mars
spec:
topology:
controlPlane:
replicas: 1
vmClass: best-effort-large
storageClass: tanzu-storage-policy
volumes:
- name: etcd
mountPath: /var/lib/etcd
capacity:
storage: 10G
- name: containerd
mountPath: /var/lib/containerd
capacity:
storage: 60G
tkr:
reference:
name: v1.21.2---vmware.1-tkg.1.ee25d55
nodePools:
- name: production
replicas: 3
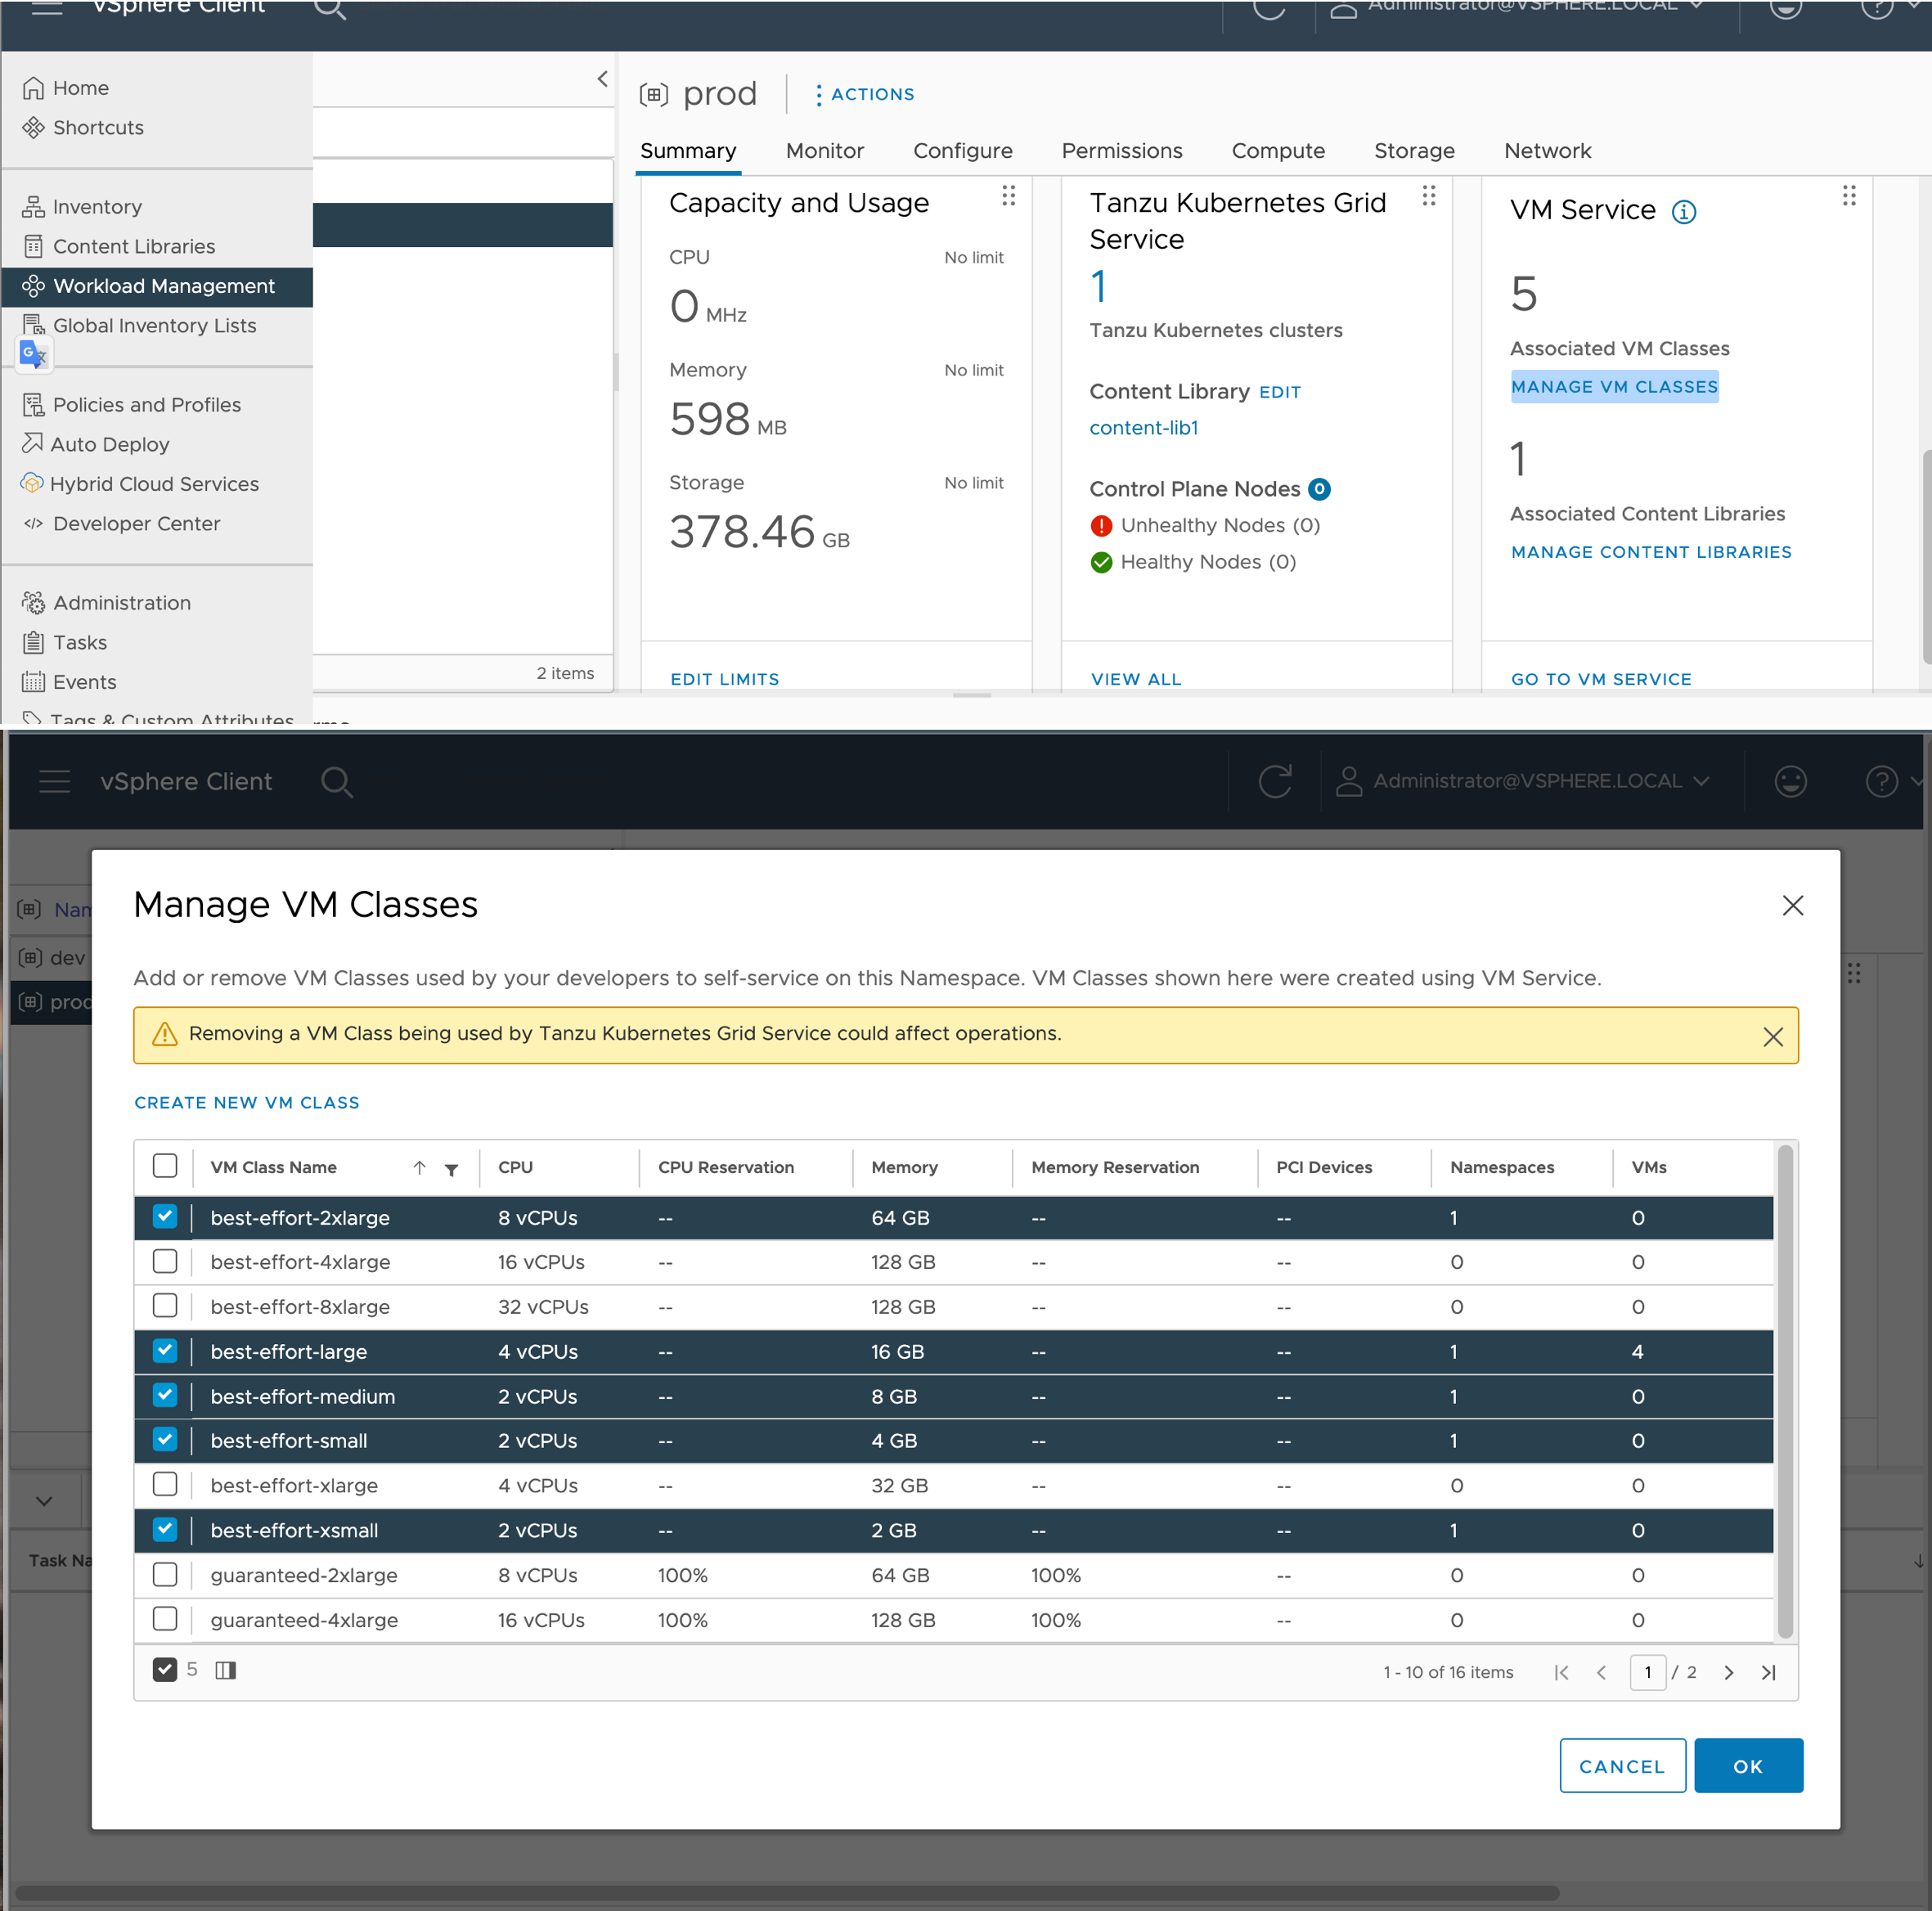
vmClass: best-effort-large #关于 Yaml 文件中的 vmClass 描述的是 Node 的配置, 我们在 Workload Management 中可以查看对它的定义
storageClass: tanzu-storage-policy
volumes:
- name: containerd
mountPath: /var/lib/containerd
capacity:
storage: 60G
tkr:
reference:
name: v1.21.2---vmware.1-tkg.1.ee25d55
settings:
storage:
classes: [tanzu-storage-policy]
defaultClass: tanzu-storage-policy
network:
cni:
name: antrea
services:
cidrBlocks: ["10.98.0.0/21"]
pods:
cidrBlocks: ["10.103.0.0/20"]关于 Yaml 文件中的 vmClass 描述的是 Node 的配置, 我们在 Workload Management 中可以查看对它的定义
3.2.2. 创建 Workload Cluster
❯ kubectl create -f 01.tkg-mars.yaml
tanzukubernetescluster.run.tanzu.vmware.com/tkg-mars created
查看 tanzukubernetescluster,直到 Ready 为 True
❯ kubectl get tanzukubernetesclusters
NAME CONTROL PLANE WORKER TKR NAME AGE READY TKR COMPATIBLE UPDATES AVAILABLE
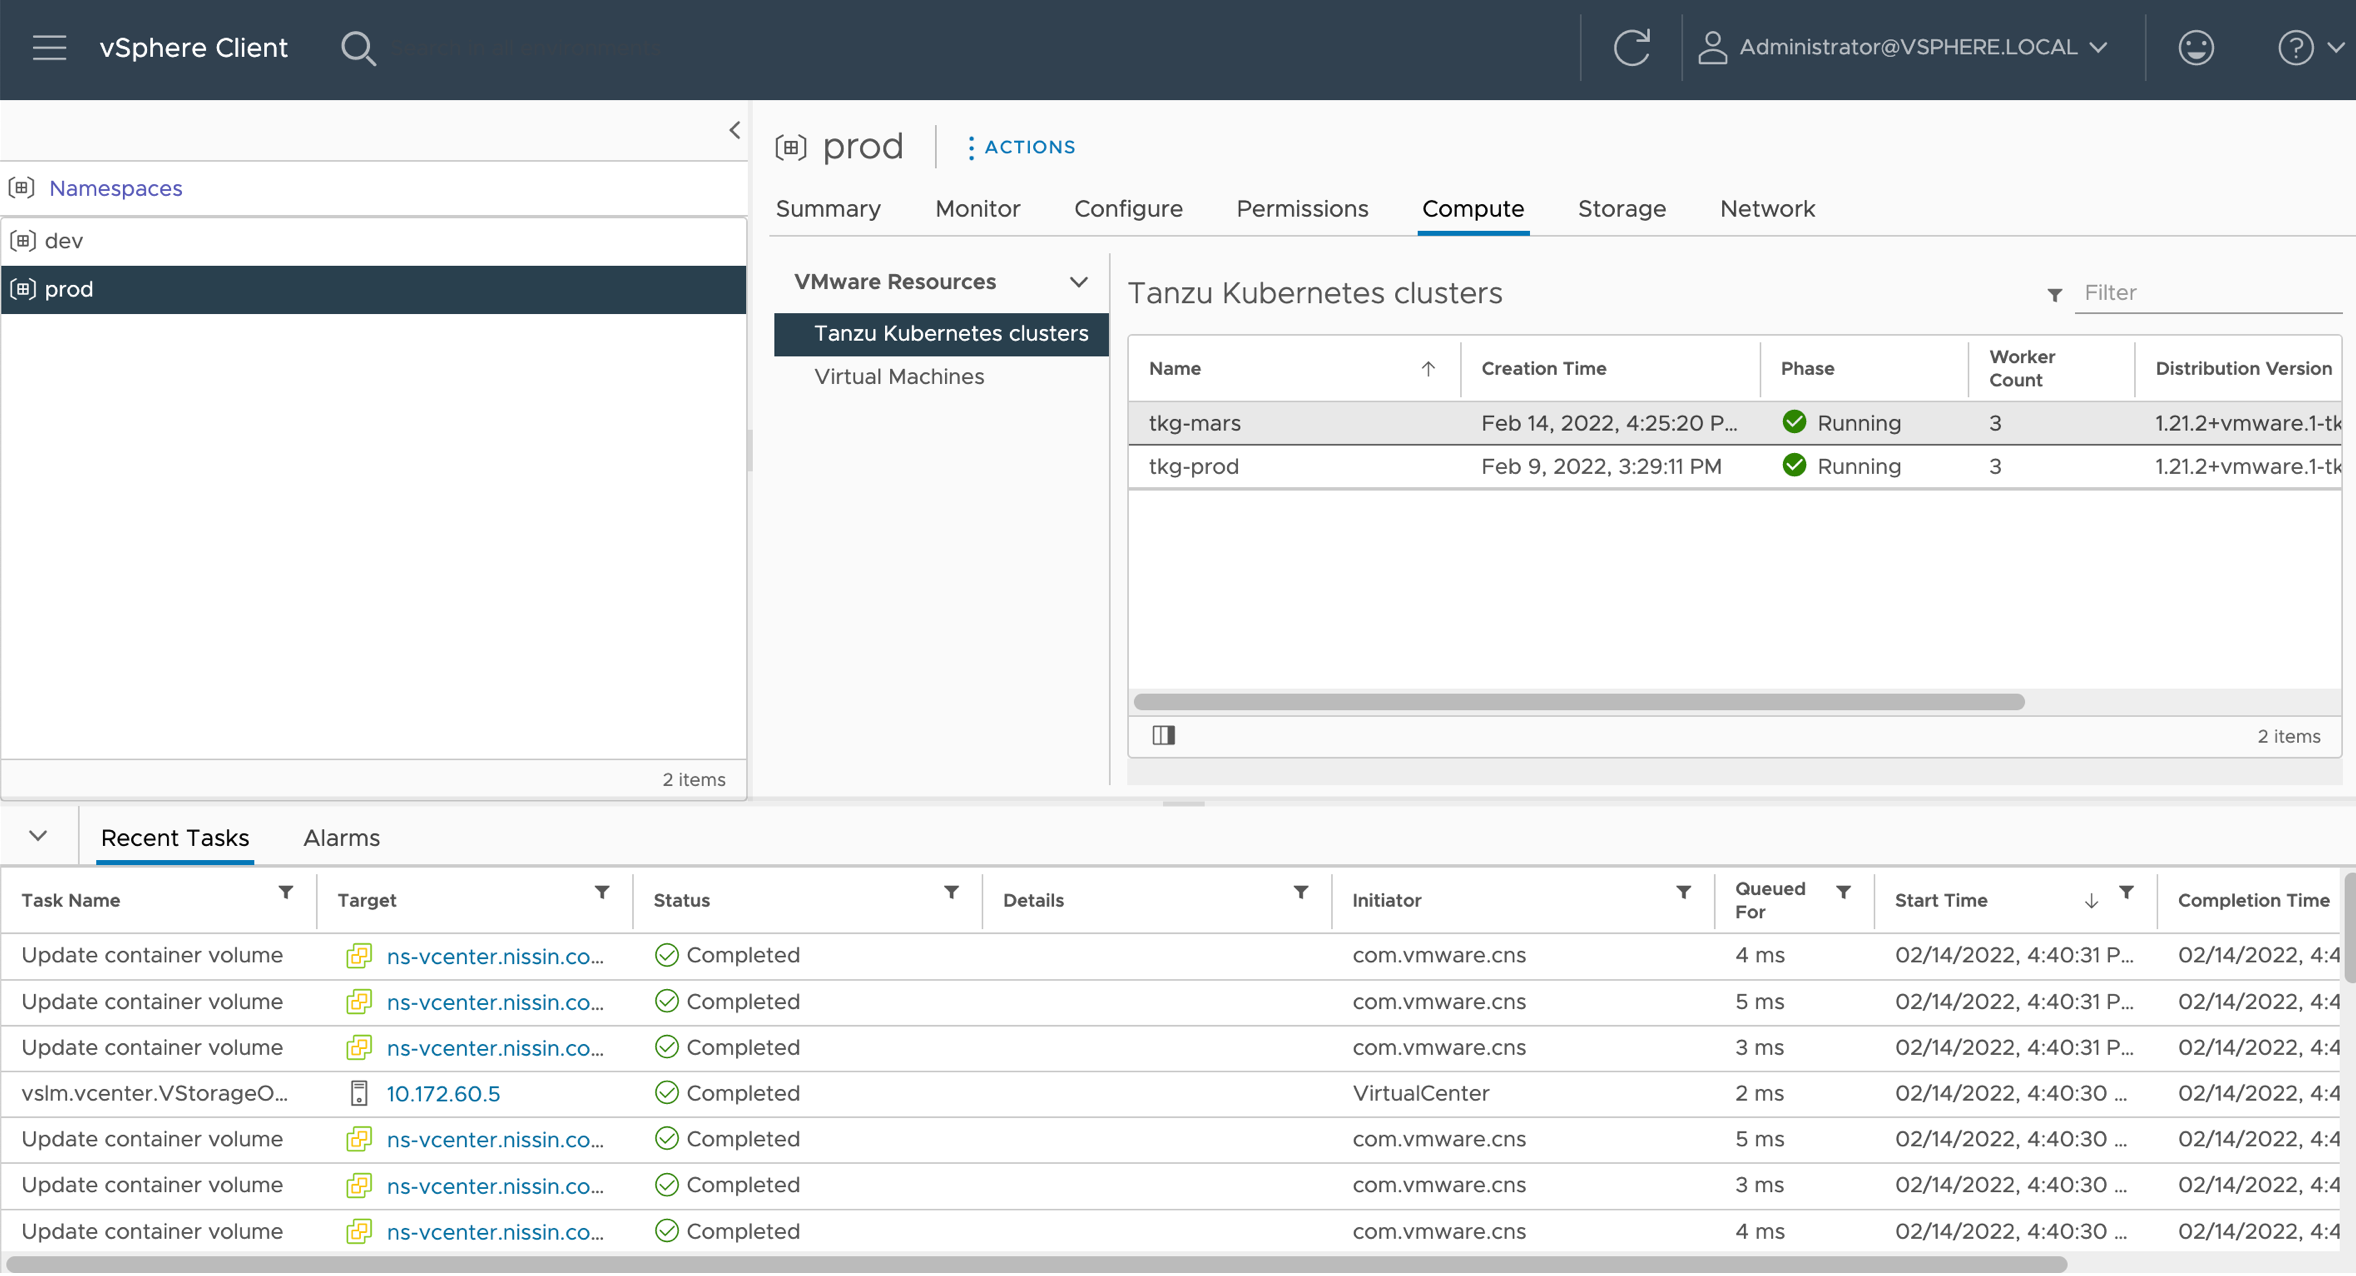
tkg-mars 1 3 v1.21.2---vmware.1-tkg.1.ee25d55 15m True True [1.21.6+vmware.1-tkg.1.b3d708a]
tkg-prod 1 3 v1.21.2---vmware.1-tkg.1.ee25d55 5d1h True True [1.21.6+vmware.1-tkg.1.b3d708a]从图形界面查看也可以
3.2.3 确认存储类已经配置好
这样我们就可以通过 CNS 生成快照,注意这个地方应该是 vSAN 类型的存储
❯ kubectl get sc
NAME                             PROVISIONER              RECLAIMPOLICY   VOLUMEBINDINGMODE   ALLOWVOLUMEEXPANSION   AGE
tanzu-storage-policy (default)   csi.vsphere.vmware.com   Delete          Immediate           true                   5h28m
3.3 登录新创建的 Workload Cluster
❯ ./kubectl-vsphere login --server=10.172.69.66 --tanzu-kubernetes-cluster-name tkg-mars --tanzu-kubernetes-cluster-namespace prod --vsphere-username administrator@vsphere.local

KUBECTL_VSPHERE_PASSWORD environment variable is not set. Please enter the password below
Password:
Logged in successfully.

You have access to the following contexts:
   10.172.69.66
   cls-18wcjlo3-100006537440-context-default
   dev
   prod
   tkg-mars
   tkg-prod

If the context you wish to use is not in this list, you may need to try
logging in again later, or contact your cluster administrator.

To change context, use `kubectl config use-context <workload name>`

~/Downloads/bin 7s
❯ kubectl config use-context tkg-mars
Switched to context "tkg-mars".
4. 安装 Kasten K10 到 Tanzu TKG
4.1 就绪检查 Pre-Flight Checks
通过 Pre-Flight Checks 脚本,我们可以验证部署的前提条件是否满足,在国内区域我们可以将脚本部署在云存储桶中,如下图。
❯ curl https://kasten-1257130361.cos.ap-chengdu.myqcloud.com/k10_primer.sh | bash
  % Total    % Received % Xferd  Average Speed   Time    Time     Time  Current
                                 Dload  Upload   Total   Spent    Left  Speed
100  7058  100  7058    0     0  19465      0 --:--:-- --:--:-- --:--:-- 20398
Namespace option not provided, using default namespace
Checking for tools
 --> Found kubectl
 --> Found helm
Checking if the Kasten Helm repo is present
 --> The Kasten Helm repo was found
Checking for required Helm version (>= v3.0.0)
 --> No Tiller needed with Helm v3.6.1
K10Primer image
 --> Using Image (ccr.ccs.tencentyun.com/kasten-k10/k10tools:4.5.4) to run test
Checking access to the Kubernetes context tkg-mars
 --> Able to access the default Kubernetes namespace
K10 Kanister tools image
 --> Using Kanister tools image (ccr.ccs.tencentyun.com/kasten-k10/kanister-tools:k10-0.69.0) to run test

Running K10Primer Job in cluster with command-
     ./k10tools primer
serviceaccount/k10-primer created
clusterrolebinding.rbac.authorization.k8s.io/k10-primer created
job.batch/k10primer created
Waiting for pod k10primer-86w2s to be ready - ContainerCreating
Waiting for pod k10primer-86w2s to be ready - ContainerCreating
Waiting for pod k10primer-86w2s to be ready -
Pod Ready!

Kubernetes Version Check:
  Valid kubernetes version (v1.21.2+vmware.1)  -  OK

RBAC Check:
  Kubernetes RBAC is enabled  -  OK

Aggregated Layer Check:
  The Kubernetes Aggregated Layer is enabled  -  OK

W0214 15:21:43.659149       9 warnings.go:70] storage.k8s.io/v1beta1 CSIDriver is deprecated in v1.19+, unavailable in v1.22+; use storage.k8s.io/v1 CSIDriver
CSI Capabilities Check:
  VolumeSnapshot CRD-based APIs are not installed  -  Error

Validating Provisioners:
csi.vsphere.vmware.com:
  Storage Classes:
    tanzu-storage-policy
      TKGS clusters are supported via K10 Generic Volume Backup. See https://docs.kasten.io/latest/install/generic.html.

Validate Generic Volume Snapshot:
  Pod Created successfully  -  OK
  GVS Backup command executed successfully  -  OK
  Pod deleted successfully  -  OK

serviceaccount "k10-primer" deleted
clusterrolebinding.rbac.authorization.k8s.io "k10-primer" deleted
job.batch "k10primer" deleted
4.2 准备部署 Kasten K10 应用,创建 clusterrolebinding
$ vim 02.psp.yaml

apiVersion: rbac.authorization.k8s.io/v1
kind: ClusterRoleBinding
metadata:
  name: kasten-io-crb
roleRef:
  kind: ClusterRole
  name: psp:vmware-system-privileged
  apiGroup: rbac.authorization.k8s.io
subjects:
# 授权命名空间下的所有服务账号(推荐):
- kind: Group
  apiGroup: rbac.authorization.k8s.io
  name: system:serviceaccounts:kasten-io
❯ kubectl create -f 02.psp.yaml
clusterrolebinding.rbac.authorization.k8s.io/kasten-io-crb created
4.3 安装 Kasten K10
- 获取 Helm Chart 供本地使用
添加 Kasten Helm charts 存储库
$ helm repo add kasten https://charts.kasten.io/

$ helm repo list
NAME            URL   ls
kasten          https://charts.kasten.io/

$ helm repo update
# 以下这条命令会把 k10-4.0.x.tgz 包下载下来,如果不加任何参数,则会下载最新的版本
# 在Air Gapped 的环境中安装时,可以先行下载再使用。
$ helm fetch kasten/k10 --version=4.5.4
Hang tight while we grab the latest from your chart repositories...
...Successfully got an update from the "kasten" chart repository
Update Complete. ⎈Happy Helming!⎈- 建立命名空间
❯ kubectl create ns kasten-io
namespace/kasten-io created

❯ helm fetch kasten/k10 --version=4.5.4- 安装 Kasten K10
❯ helm install k10 k10-4.5.4.tgz --namespace kasten-io --set global.airgapped.repository=ccr.ccs.tencentyun.com/kasten-k10 \
  --set auth.tokenAuth.enabled=true \
  --set metering.mode=airgap \
  --set injectKanisterSidecar.enabled=true \
  --set-string injectKanisterSidecar.namespaceSelector.matchLabels.k10/injectKanisterSidecar=true \
  --set global.persistence.storageClass=tanzu-storage-policy

❯ kubectl get po -n kasten-io
NAME                                  READY   STATUS    RESTARTS   AGE
aggregatedapis-svc-57d7c44b9d-7b9bb   1/1     Running   0          4h33m
auth-svc-58999fb4f8-d4pzp             1/1     Running   0          4h33m
catalog-svc-85f8cc5c4d-fr9bn          2/2     Running   0          4h33m
config-svc-688c5477bf-8s7fs           1/1     Running   0          4h33m
crypto-svc-5b8b448bb5-729n7           2/2     Running   0          4h33m
dashboardbff-svc-6c756544c8-4d4b5     1/1     Running   0          4h33m
executor-svc-95b4464df-dz4rs          2/2     Running   0          4h33m
executor-svc-95b4464df-jg9cq          2/2     Running   0          4h33m
executor-svc-95b4464df-jjk9r          2/2     Running   0          4h33m
frontend-svc-588f856d48-k8z6x         1/1     Running   0          4h33m
gateway-6b7bfd947d-hdx7s              1/1     Running   0          4h33m
jobs-svc-b9db684cd-jpwsc              1/1     Running   0          4h33m
k10-grafana-7b55879b88-k7c96          1/1     Running   0          4h33m
kanister-svc-7497d4ffc9-w67j2         1/1     Running   0          4h33m
logging-svc-6bd9c48b9c-46rv8          1/1     Running   0          4h33m
metering-svc-6d74f5f96d-f7p6l         1/1     Running   0          4h33m
prometheus-server-7f78865fb7-drsgg    2/2     Running   0          4h33m
state-svc-86ccd97996-v5gks            1/1     Running   0          4h33m
4.4 查看 Kasten 的服务
❯ kubectl get svc -n kasten-io
NAME                    TYPE        CLUSTER-IP    EXTERNAL-IP   PORT(S)                        AGE
aggregatedapis-svc      ClusterIP   10.98.1.9     <none>        443/TCP                        36m
auth-svc                ClusterIP   10.98.0.62    <none>        8000/TCP                       36m
catalog-svc             ClusterIP   10.98.2.197   <none>        8000/TCP                       36m
config-svc              ClusterIP   10.98.1.55    <none>        8000/TCP,443/TCP               36m
crypto-svc              ClusterIP   10.98.0.14    <none>        8000/TCP,8001/TCP              36m
dashboardbff-svc        ClusterIP   10.98.5.107   <none>        8000/TCP                       36m
executor-svc            ClusterIP   10.98.2.40    <none>        8000/TCP                       36m
frontend-svc            ClusterIP   10.98.7.249   <none>        8000/TCP                       36m
gateway                 ClusterIP   10.98.0.124   <none>        8000/TCP                       36m
gateway-admin           ClusterIP   10.98.1.112   <none>        8877/TCP                       36m
jobs-svc                ClusterIP   10.98.5.62    <none>        8000/TCP                       36m
k10-grafana             ClusterIP   10.98.6.197   <none>        80/TCP                         36m
kanister-svc            ClusterIP   10.98.3.232   <none>        8000/TCP                       36m
logging-svc             ClusterIP   10.98.1.158   <none>        8000/TCP,24224/TCP,24225/TCP   36m
metering-svc            ClusterIP   10.98.3.58    <none>        8000/TCP                       36m
prometheus-server       ClusterIP   10.98.5.23    <none>        80/TCP                         36m
prometheus-server-exp   ClusterIP   10.98.3.135   <none>        80/TCP                         36m
state-svc               ClusterIP   10.98.1.125   <none>        8000/TCP                       36m
4.5 登录 Kasten UI
- 暴露 Load Balance 类型的 Service,使 Kasten 具备 访问接口
❯ kubectl expose -n kasten-io svc gateway --name=gatewaylb --type=LoadBalancer --port=8000 --target-port=8000
service/gatewaylb exposed-
查看登录中服务的 IP 地址
❯ kubectl get svc -n kasten-io NAME TYPE CLUSTER-IP EXTERNAL-IP PORT(S) AGE aggregatedapis-svc ClusterIP 10.98.1.9 <none> 443/TCP 44m auth-svc ClusterIP 10.98.0.62 <none> 8000/TCP 44m catalog-svc ClusterIP 10.98.2.197 <none> 8000/TCP 44m config-svc ClusterIP 10.98.1.55 <none> 8000/TCP,443/TCP 44m crypto-svc ClusterIP 10.98.0.14 <none> 8000/TCP,8001/TCP 44m dashboardbff-svc ClusterIP 10.98.5.107 <none> 8000/TCP 44m executor-svc ClusterIP 10.98.2.40 <none> 8000/TCP 44m frontend-svc ClusterIP 10.98.7.249 <none> 8000/TCP 44m gateway ClusterIP 10.98.0.124 <none> 8000/TCP 44m gateway-admin ClusterIP 10.98.1.112 <none> 8877/TCP 44m gatewaylb LoadBalancer 10.98.1.130 10.172.69.78 8000:32169/TCP 11s jobs-svc ClusterIP 10.98.5.62 <none> 8000/TCP 44m k10-grafana ClusterIP 10.98.6.197 <none> 80/TCP 44m kanister-svc ClusterIP 10.98.3.232 <none> 8000/TCP 44m logging-svc ClusterIP 10.98.1.158 <none> 8000/TCP,24224/TCP,24225/TCP 44m metering-svc ClusterIP 10.98.3.58 <none> 8000/TCP 44m prometheus-server ClusterIP 10.98.5.23 <none> 80/TCP 44m prometheus-server-exp ClusterIP 10.98.3.135 <none> 80/TCP 44m state-svc ClusterIP 10.98.1.125 <none> 8000/TCP 44m -
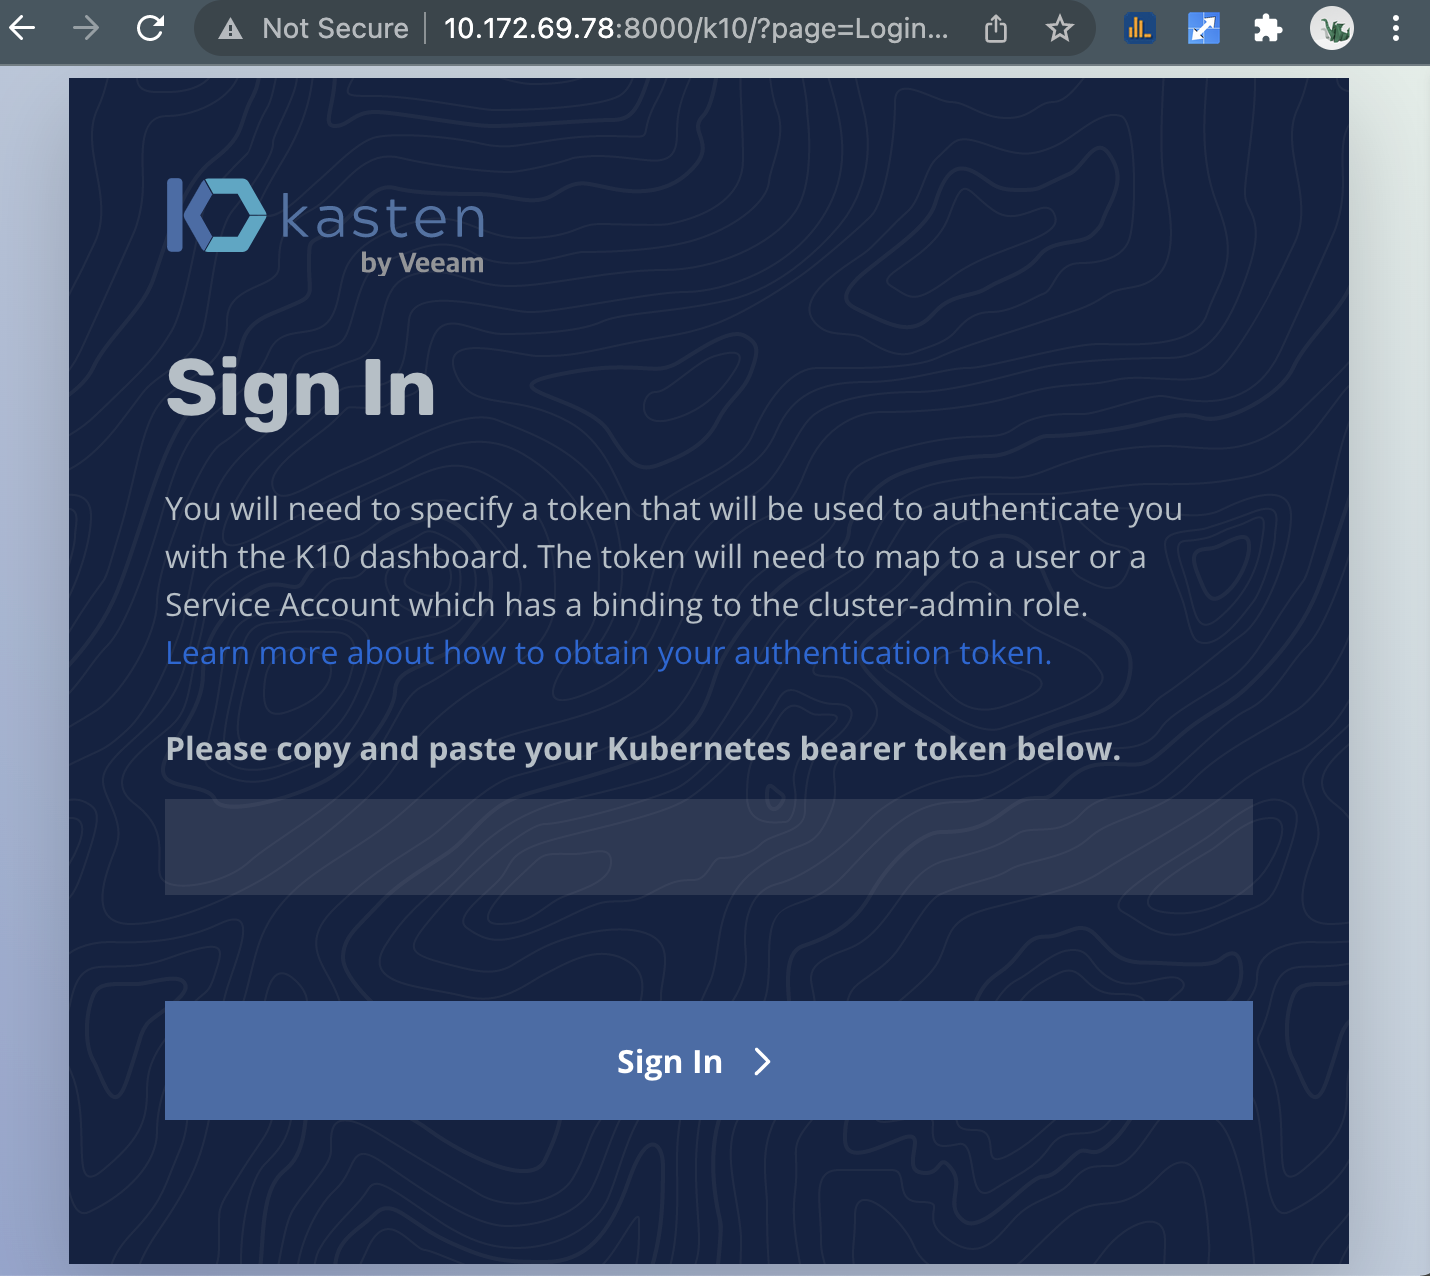
浏览器访问如下地址,填入 Token
http:// 10.172.69.78:8000/k10/#/
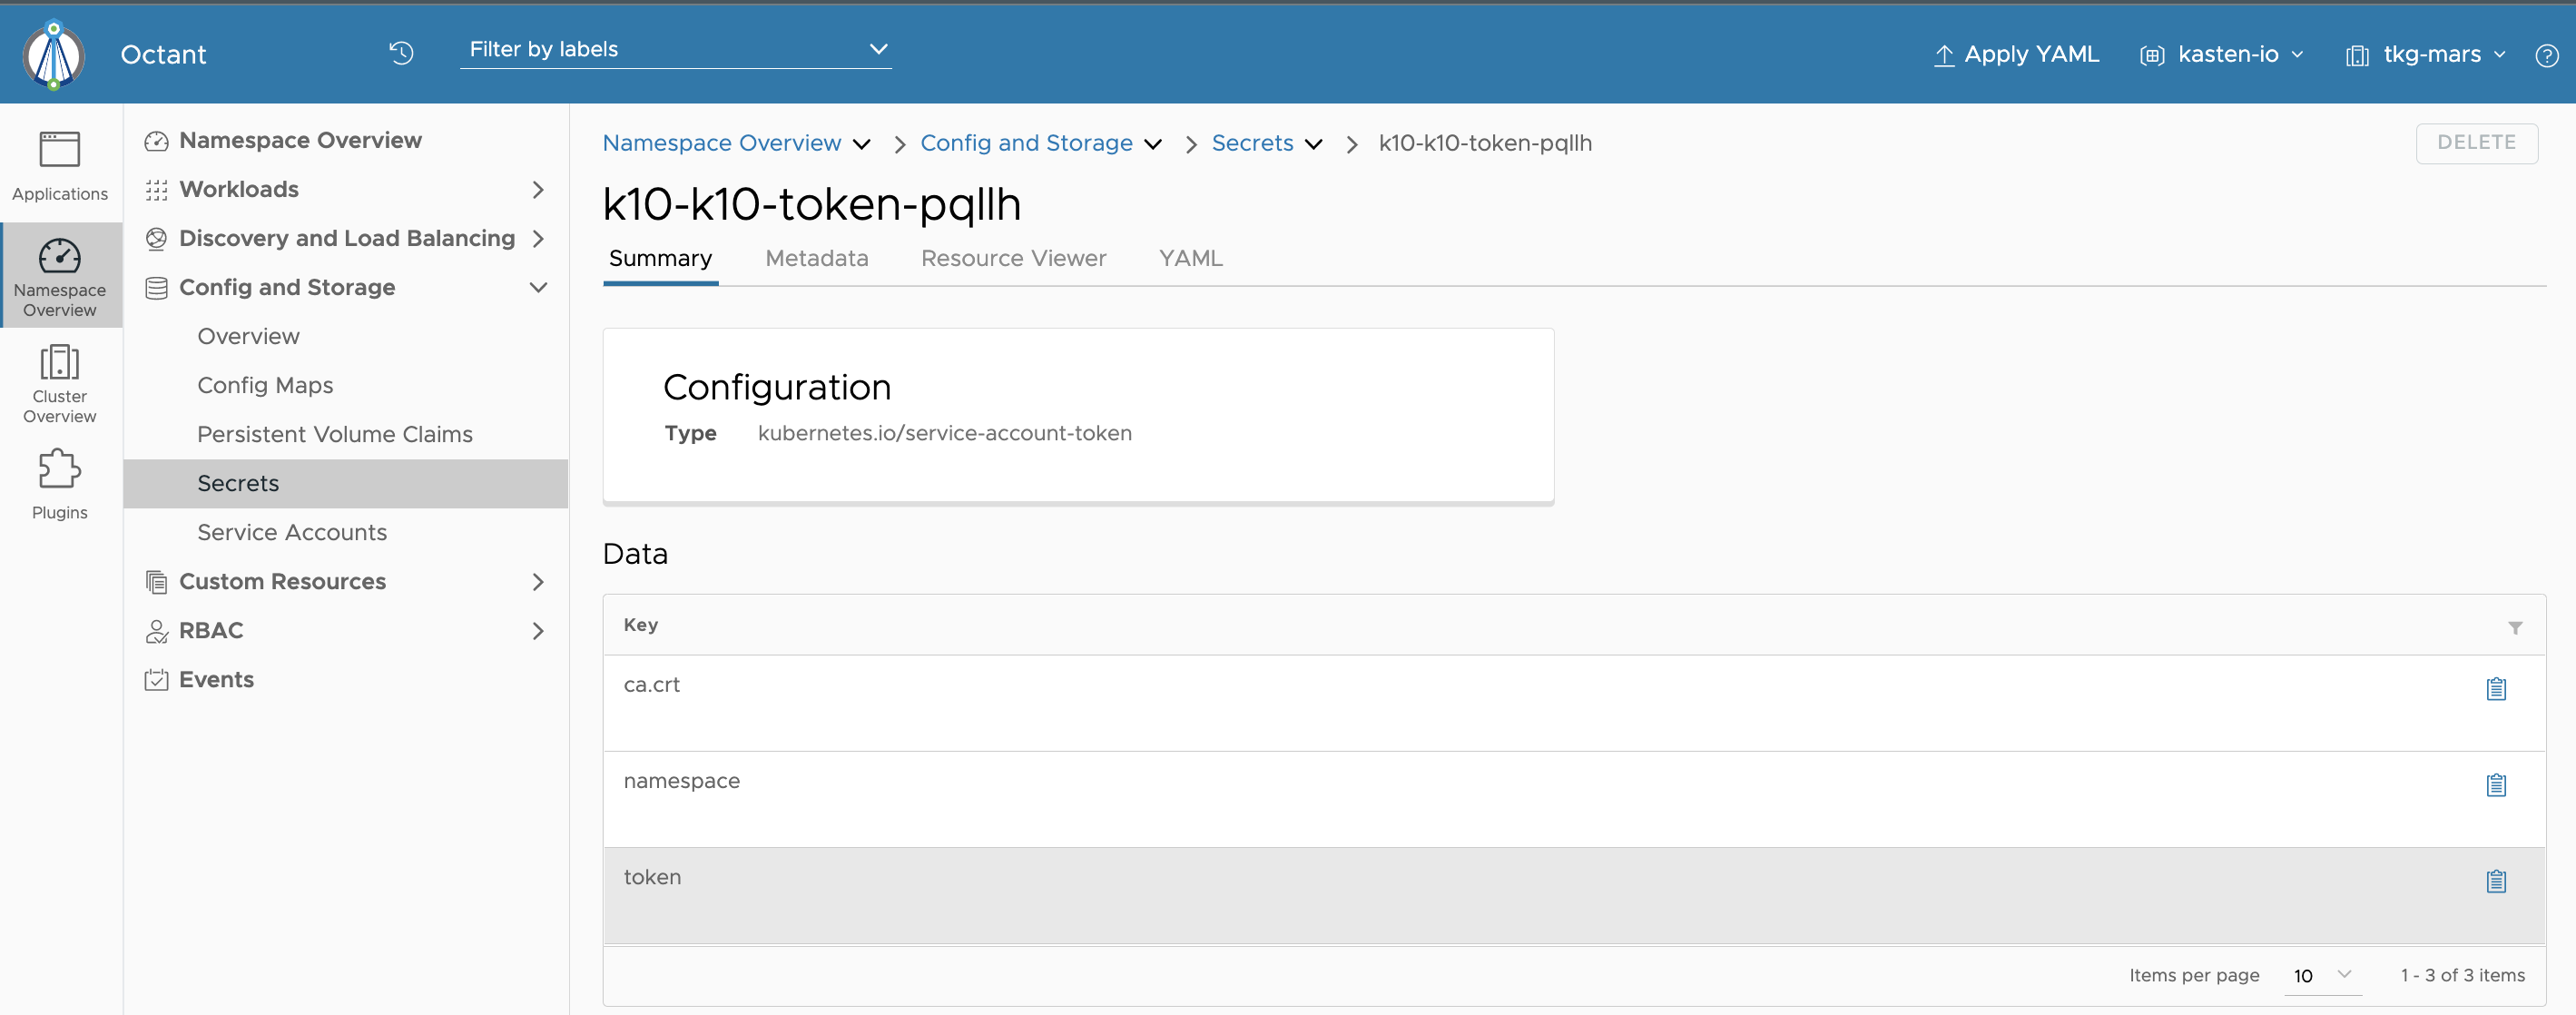
在终端输入如下命令获取 Token
$ sa_secret=$(kubectl get serviceaccount k10-k10 -o jsonpath="{.secrets[0].name}" --namespace kasten-io) && \
  kubectl get secret $sa_secret --namespace kasten-io -ojsonpath="{.data.token}{'\n'}" | base64 --decode
4.6 使用 octant 查看 Kasten 安装情况
❯ ./octant 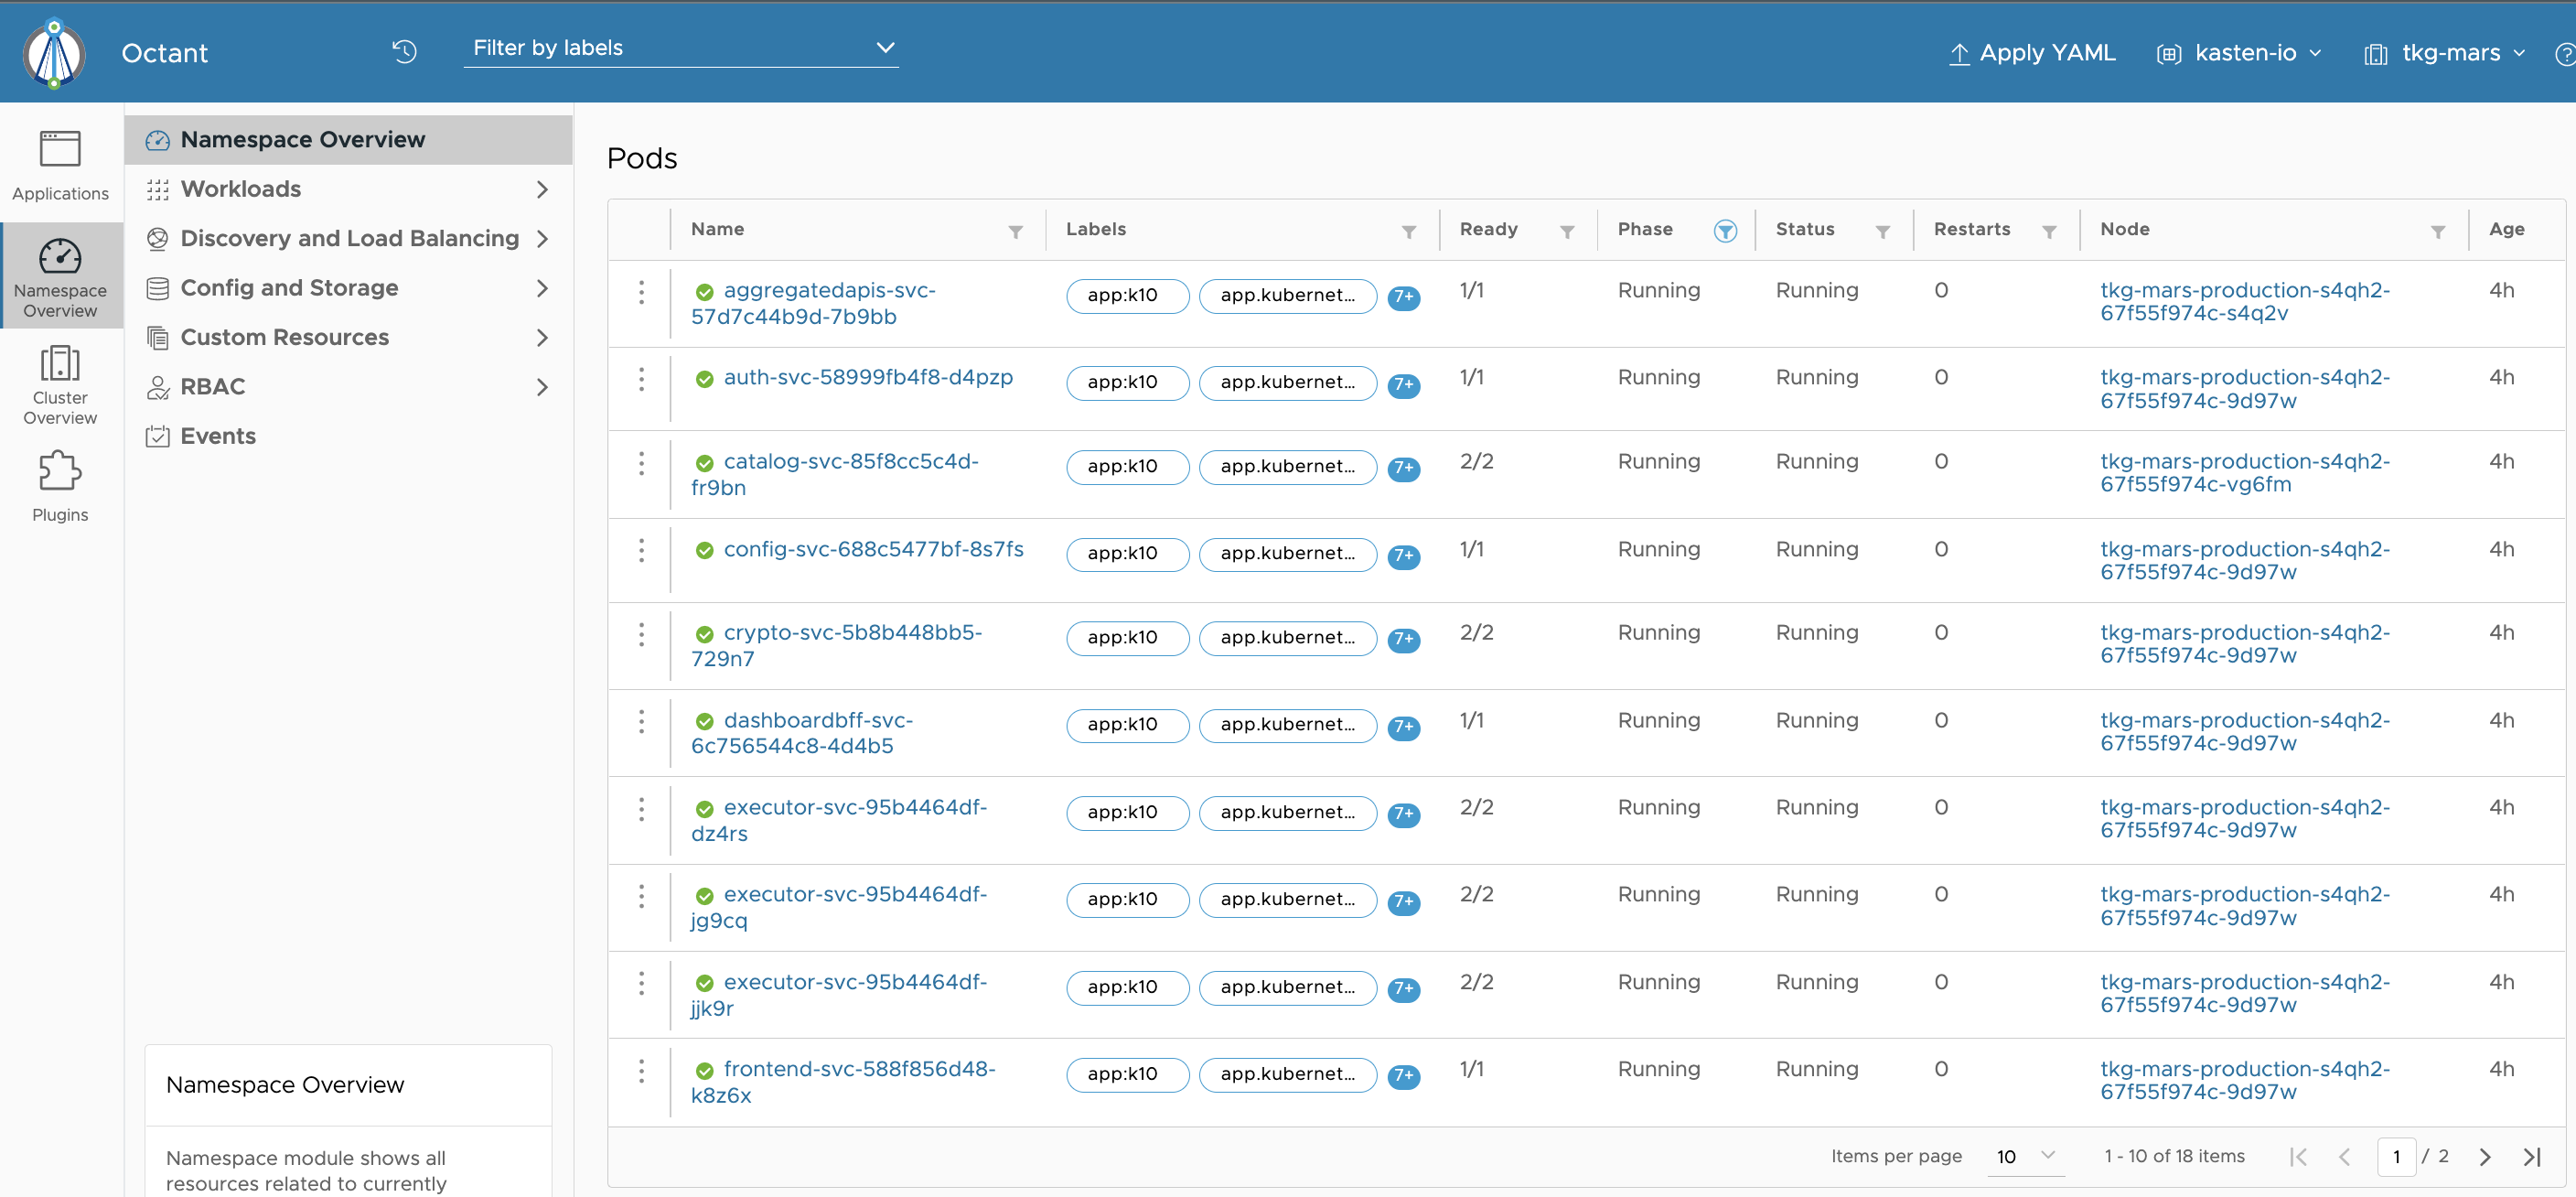
从 Octant 获取 Token ,点击 token 后面的剪贴板图标
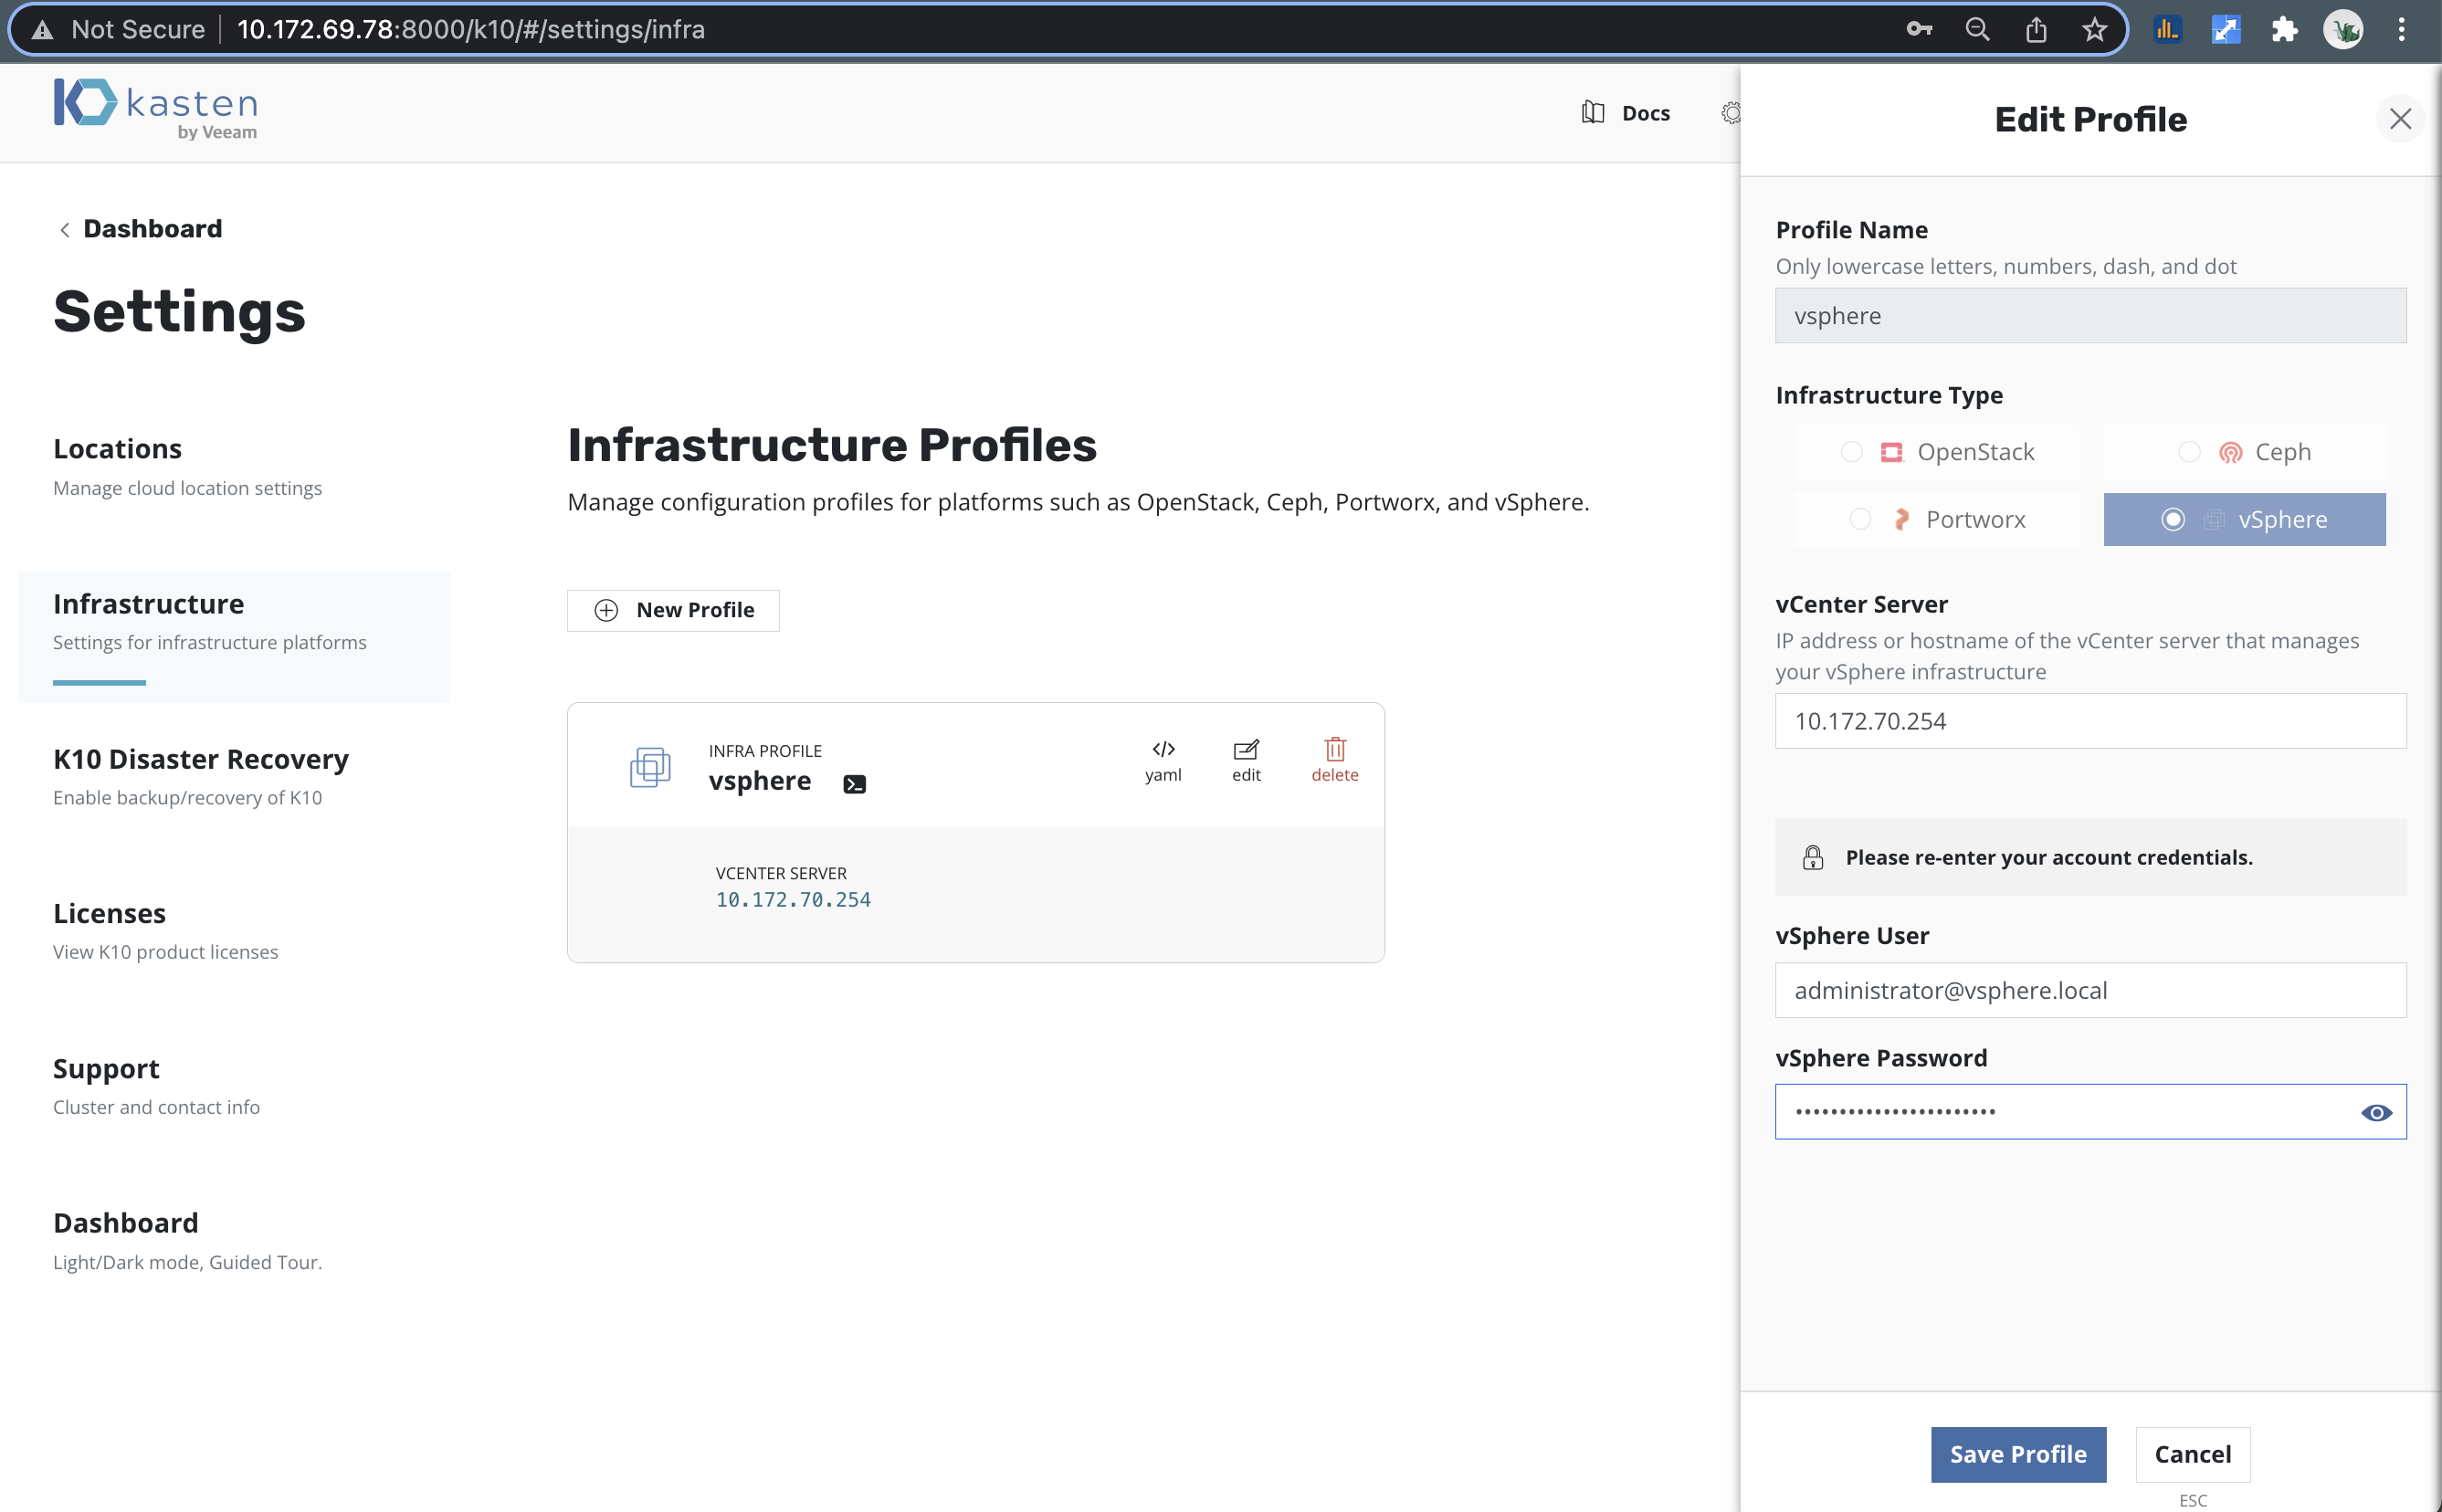
5. 配置 Infrastructure Profiles 与 vSphere 存储集成
登录 UI 后在界面中点击 Settings

K10 支持 vSphere 存储集成,可以通过从“设置”菜单创建 vSphere 基础架构配置文件来启用。必须使用 vSphere CSI 置备程序置备持久卷。
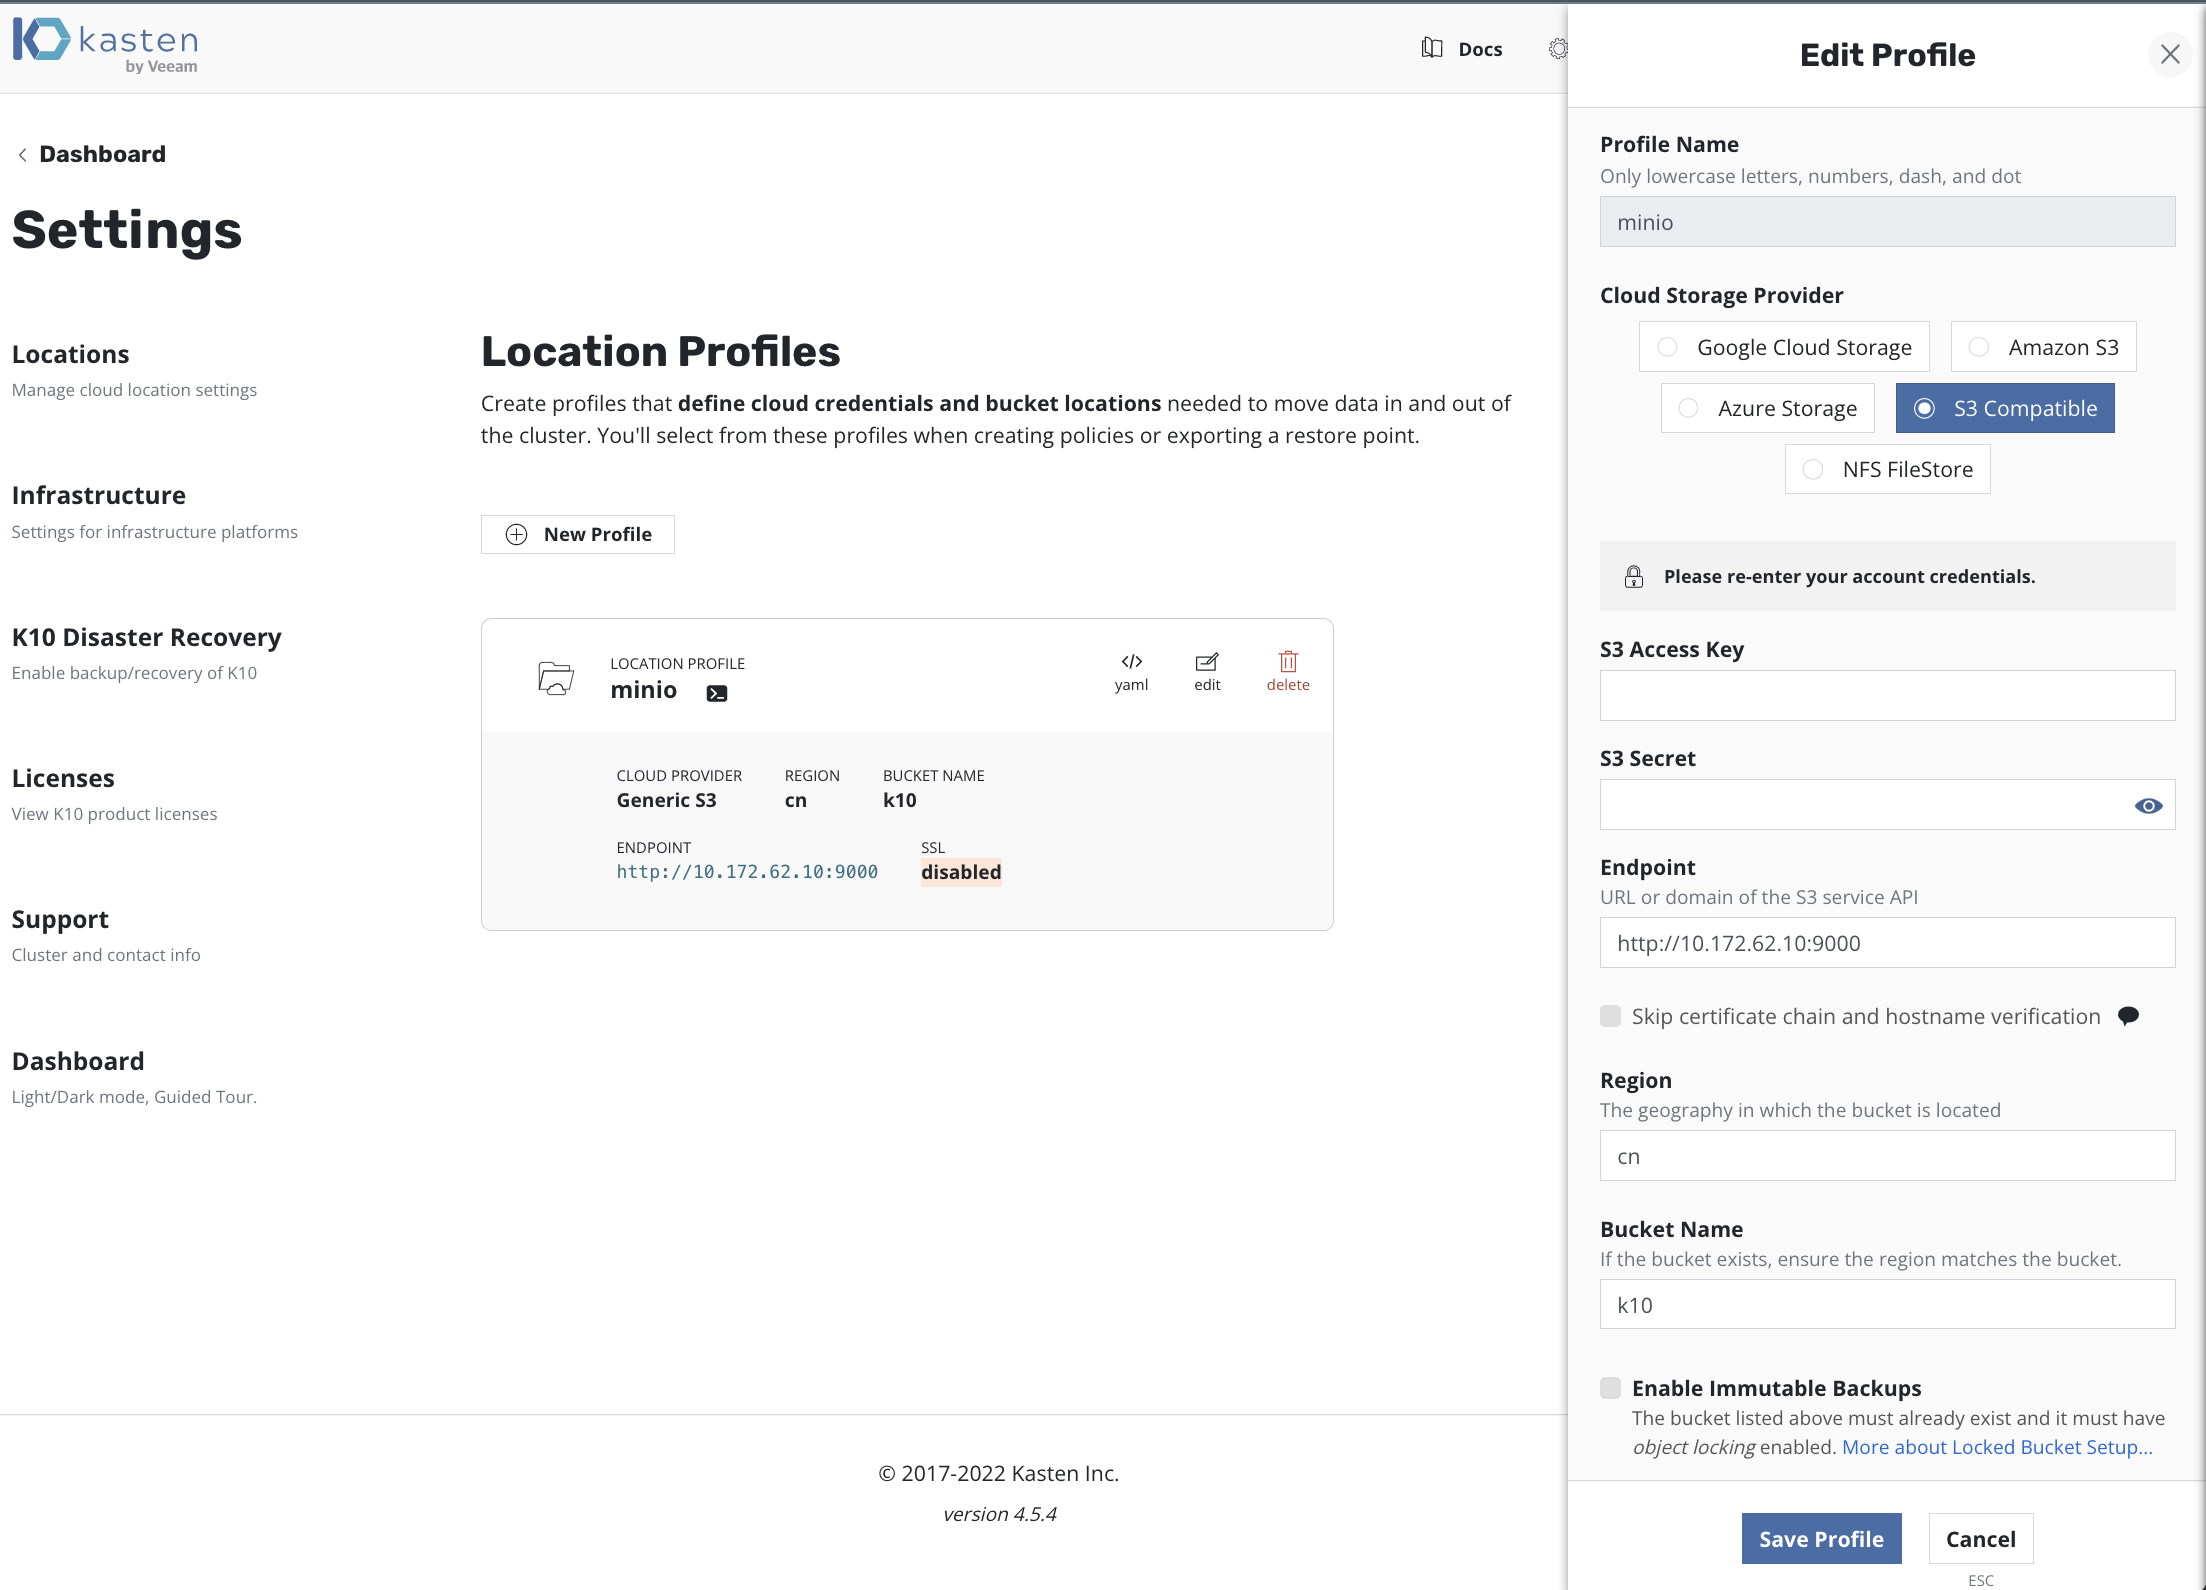
6. 配置 MinIO 作为备份存储库
我们可以能过设置 S3 Compatible 存储库的方式,将MinIO 对象存储设置成为备份存储库,满足 3-2-1-1-0 的备份黄金法则。
7. 安装测试程序 Mysql
- 建立 ClusterRoleBinding
apiVersion: rbac.authorization.k8s.io/v1
kind: ClusterRoleBinding
metadata:
  name: mysql-crb
roleRef:
  kind: ClusterRole
  name: psp:vmware-system-privileged
  apiGroup: rbac.authorization.k8s.io
subjects:
# 授权命名空间下的所有服务账号(推荐):
- kind: Group
  apiGroup: rbac.authorization.k8s.io
  name: system:serviceaccounts:mysql
❯ kubectl create -f 03.psp-mysql.yaml
clusterrolebinding.rbac.authorization.k8s.io/mysql-crb created- 安装数据库应用 Mysql
❯ helm install mysql-release bitnami/mysql --namespace mysql \
--set auth.rootPassword='Start123' \
--set primary.persistence.size=10Gi
❯ kubectl get po -n mysql NAME READY STATUS RESTARTS AGE mysql-release-0 1/1 Running 0 2m55s
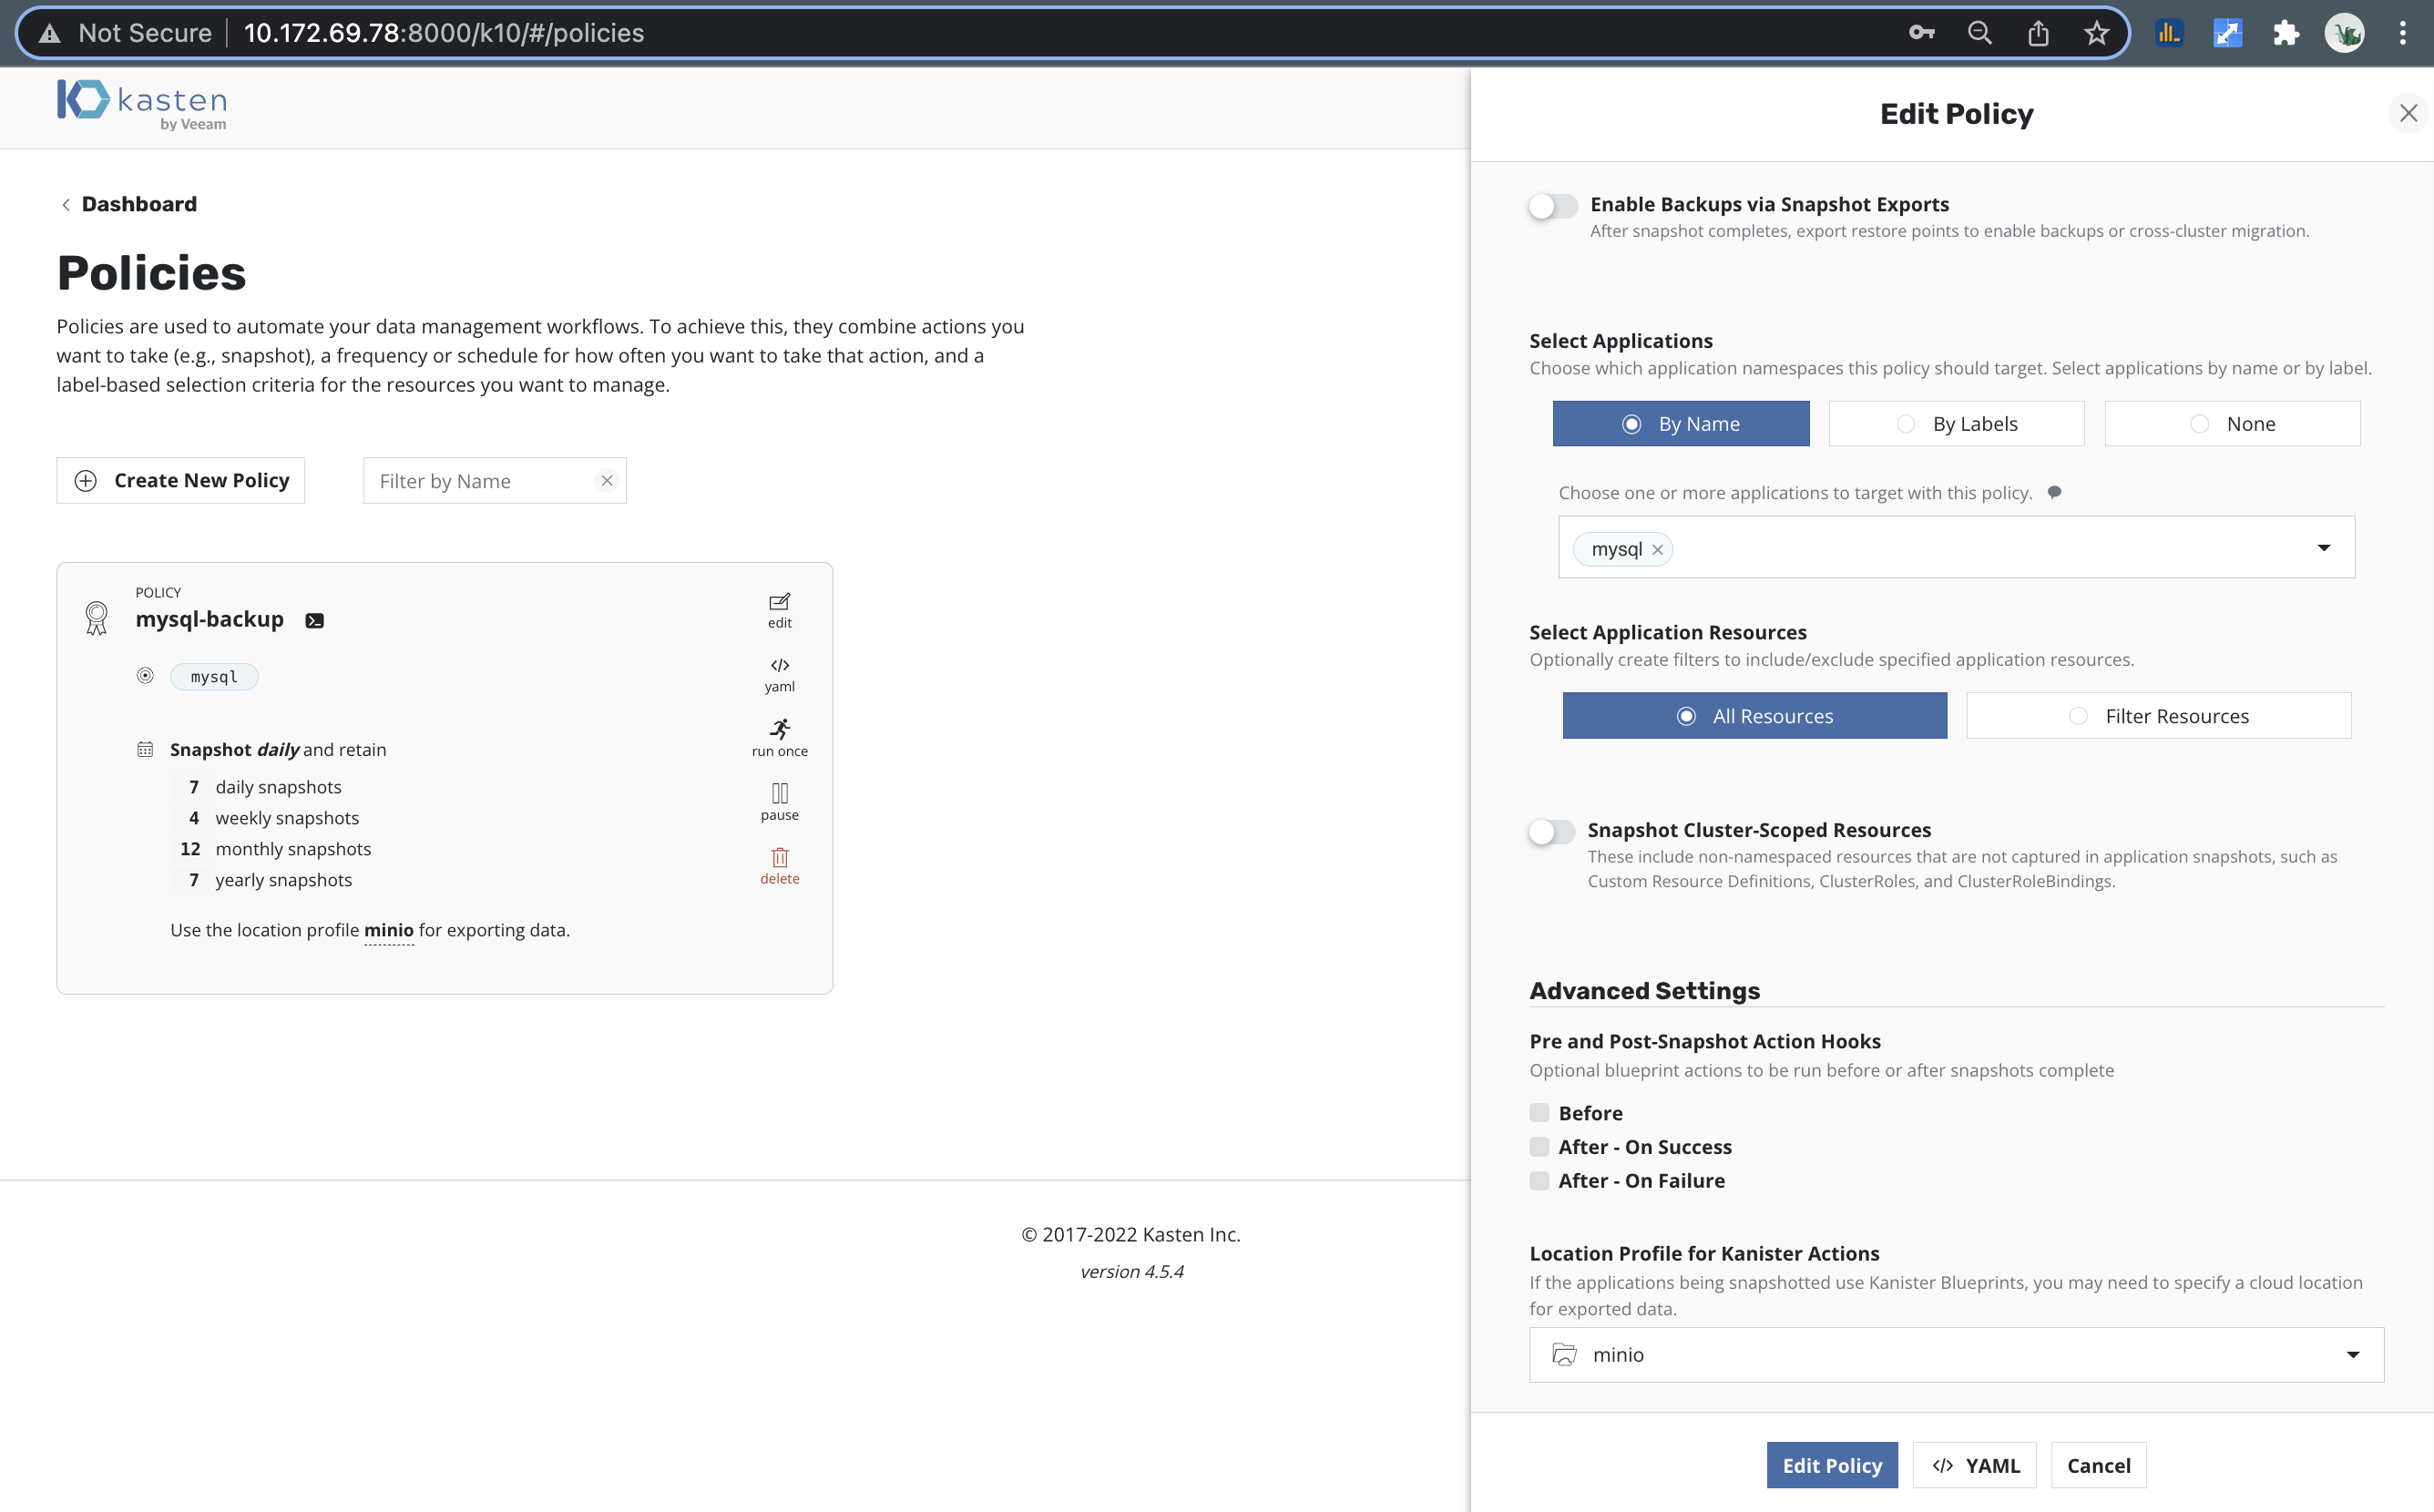
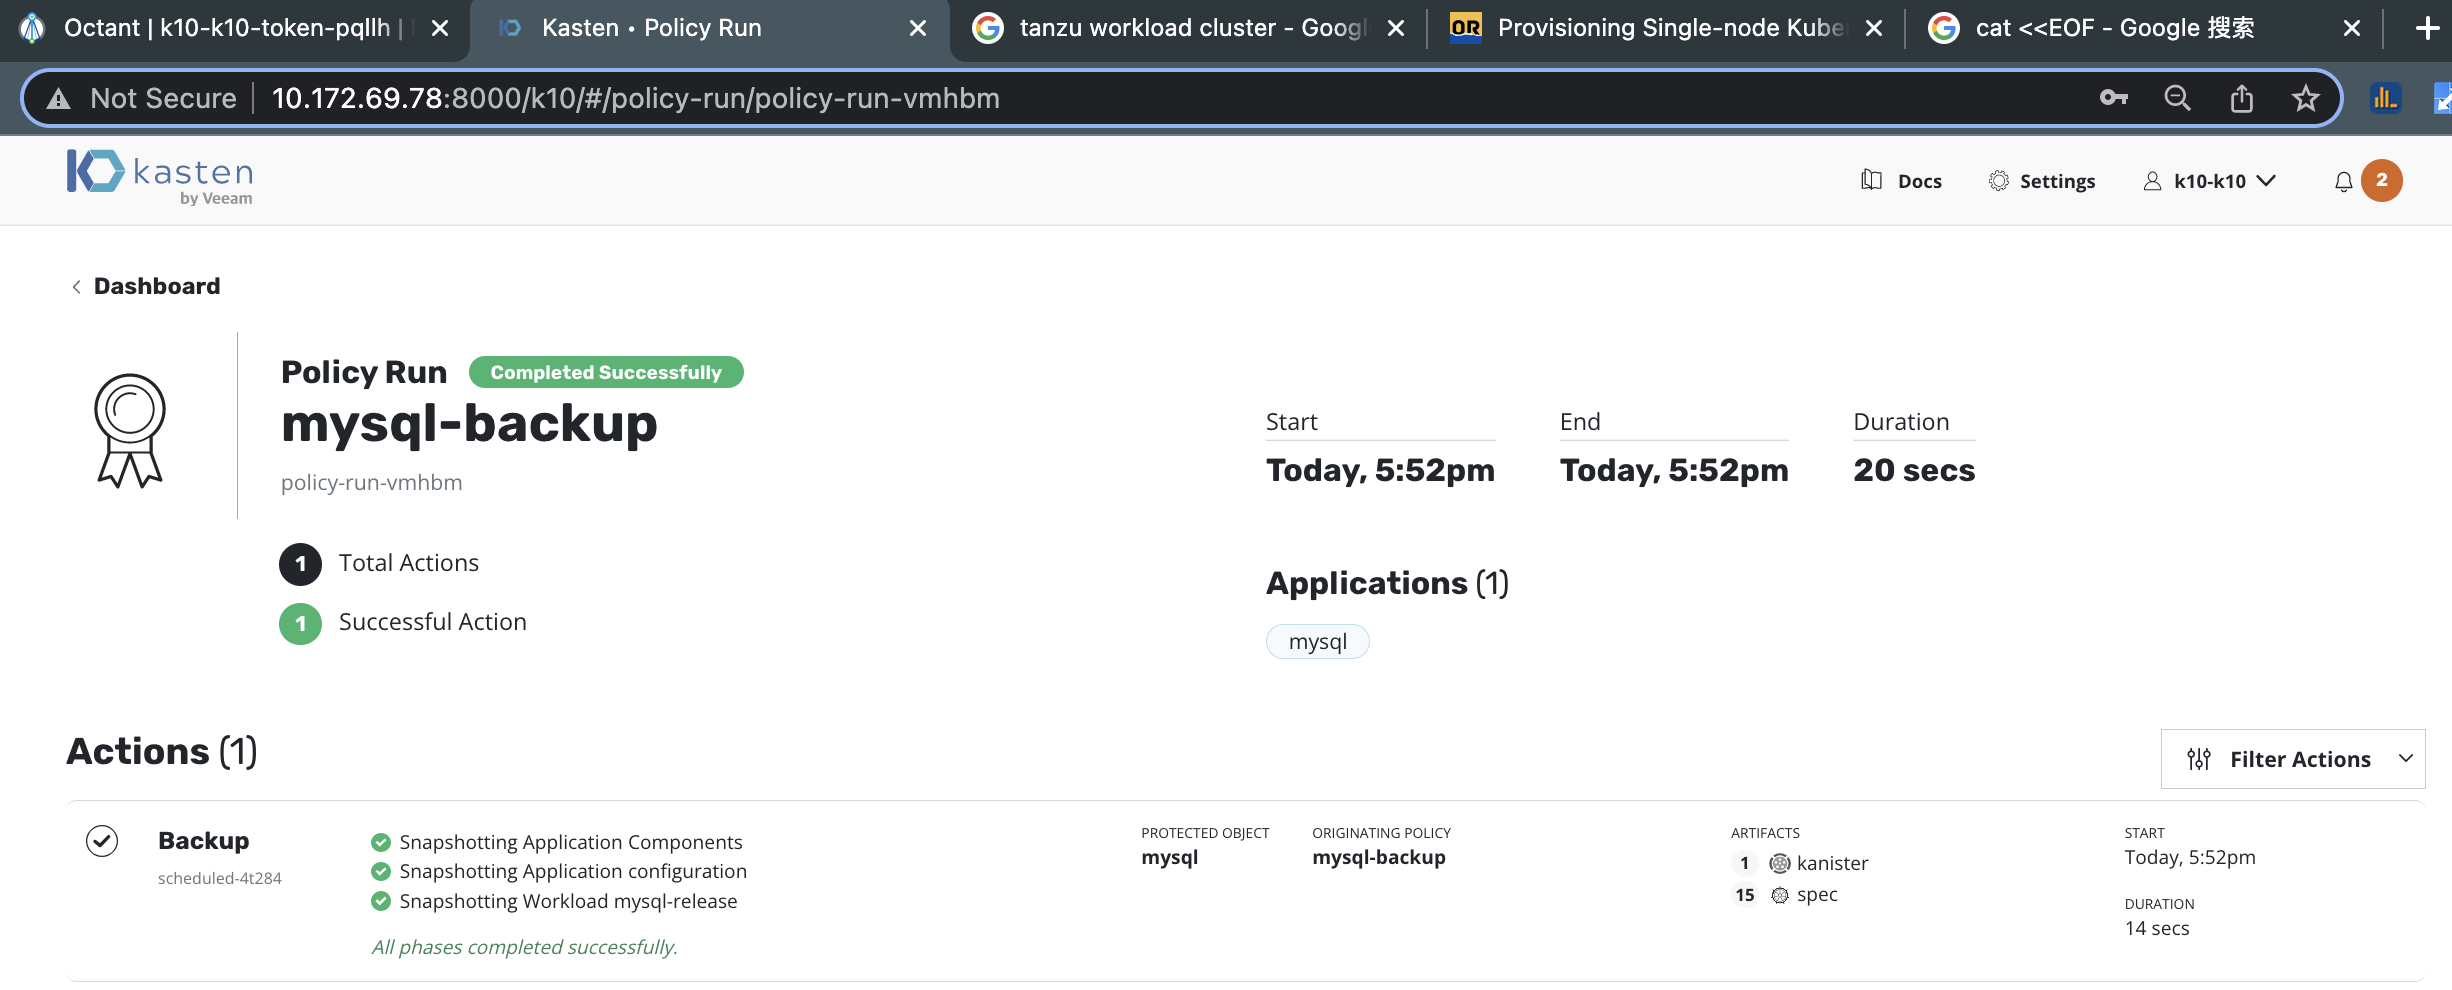
8. 云原生应用的备份与还原
8.1 云原生应用的备份
点击 Create Policy, 让我们创建一个数据备份策略
点击 Run Once 执行备份任务
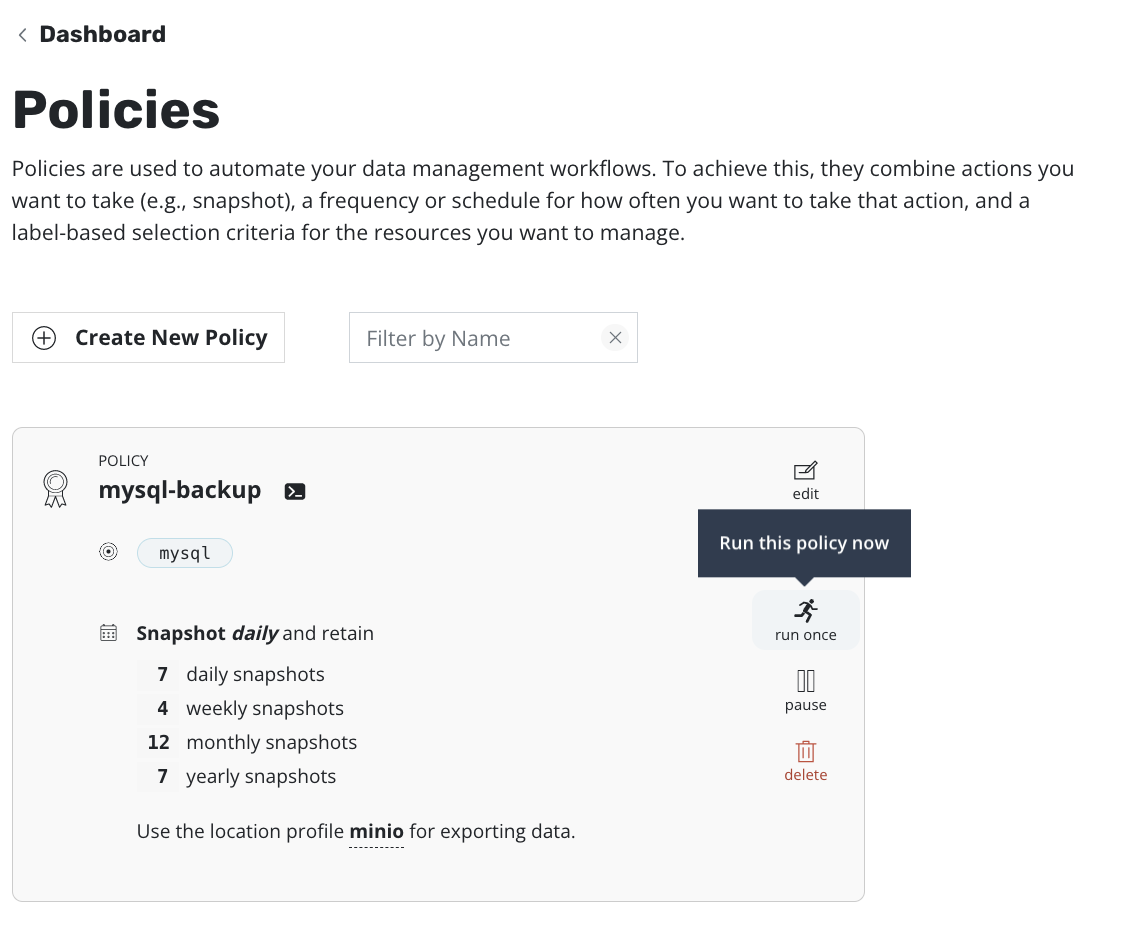
观察 Dashboard 可以看到应用已经备份完成
8.2 云原生应用的还原
在 Dashboard 中找到 Applications 点击 Restore
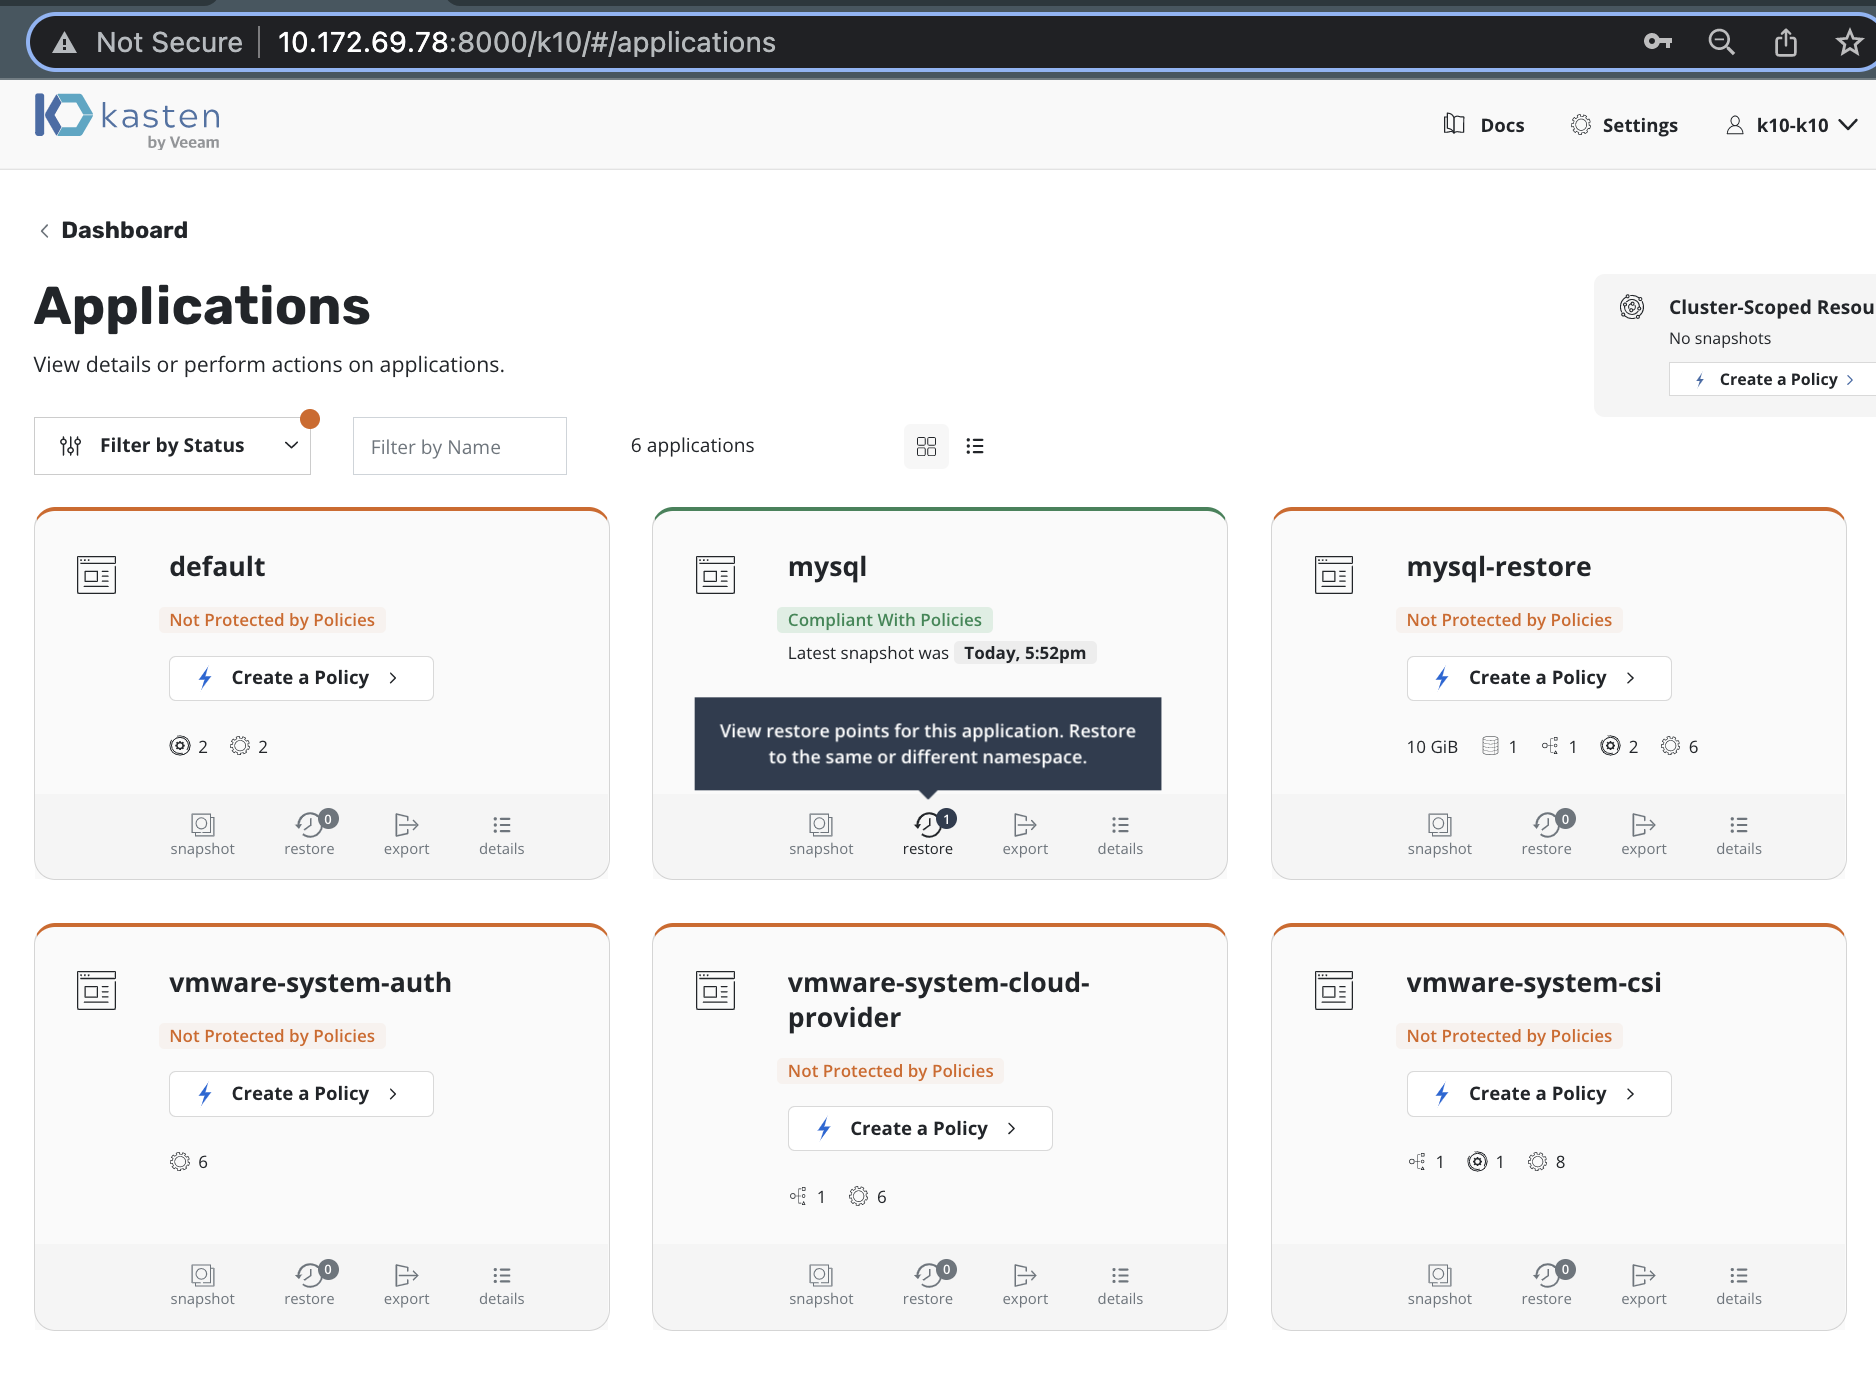
选择还原的时间点

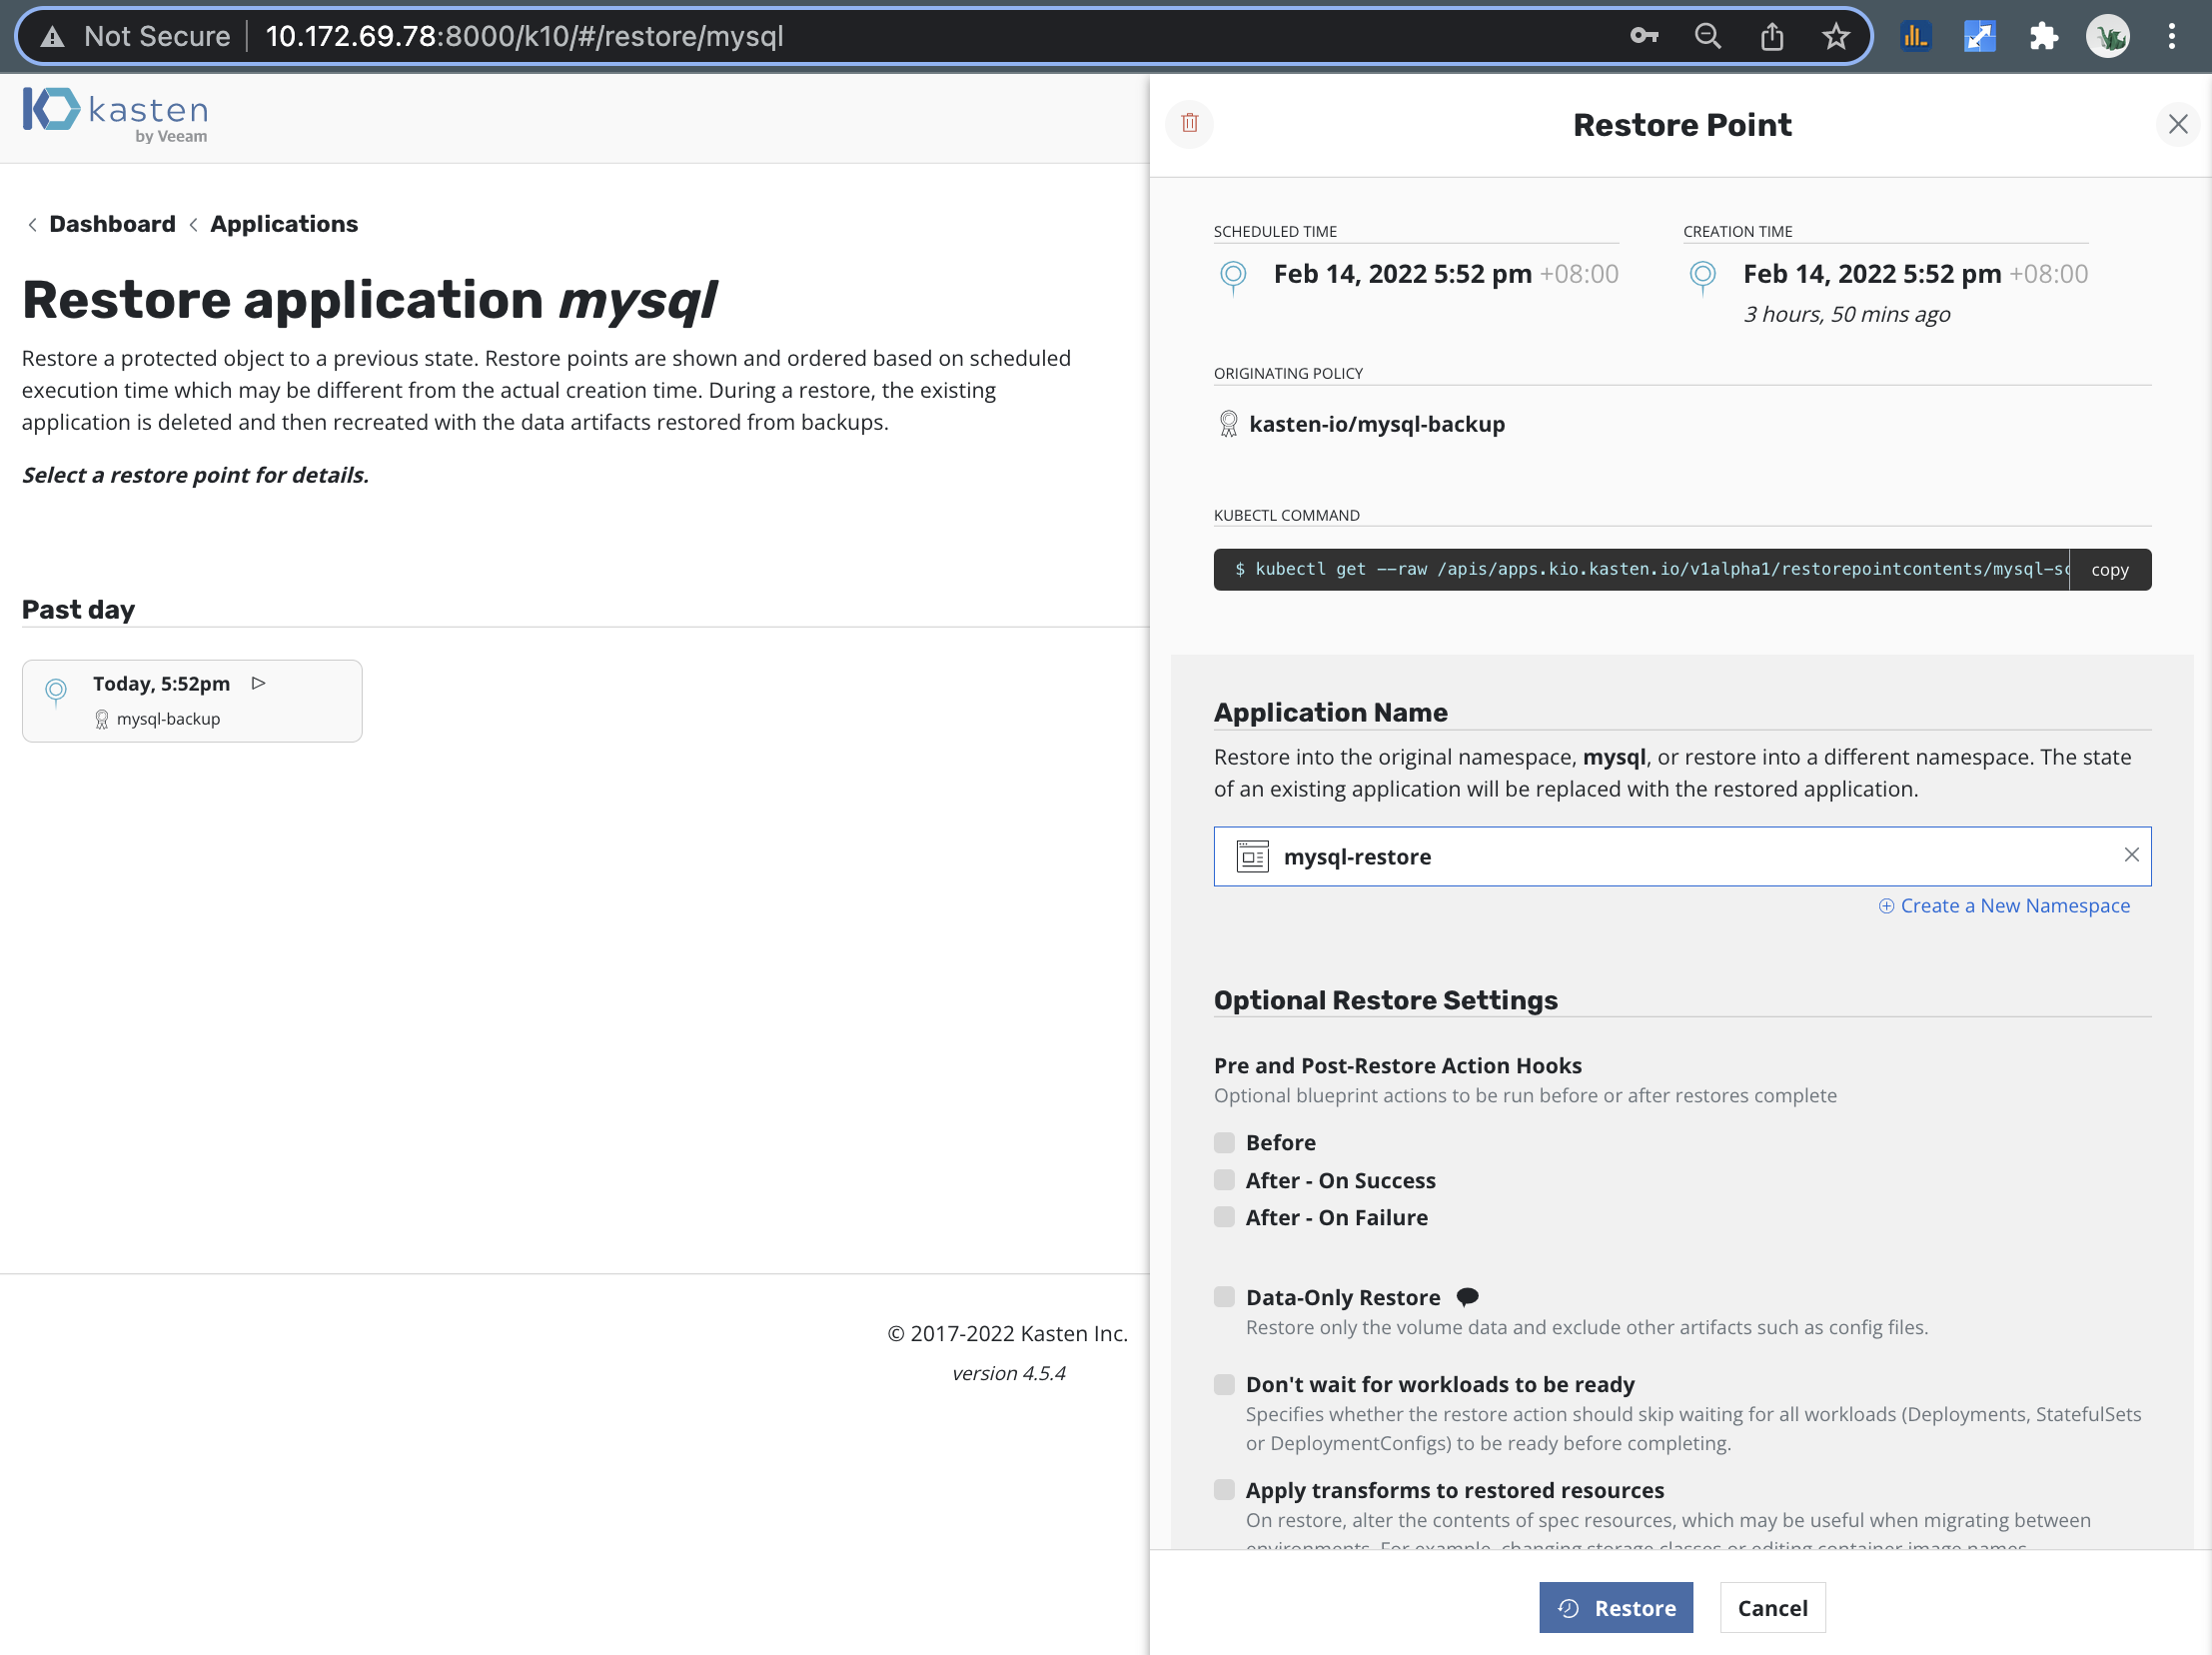
新建一个 Namespace 进行还原,这里我们命名为 mysql-restore
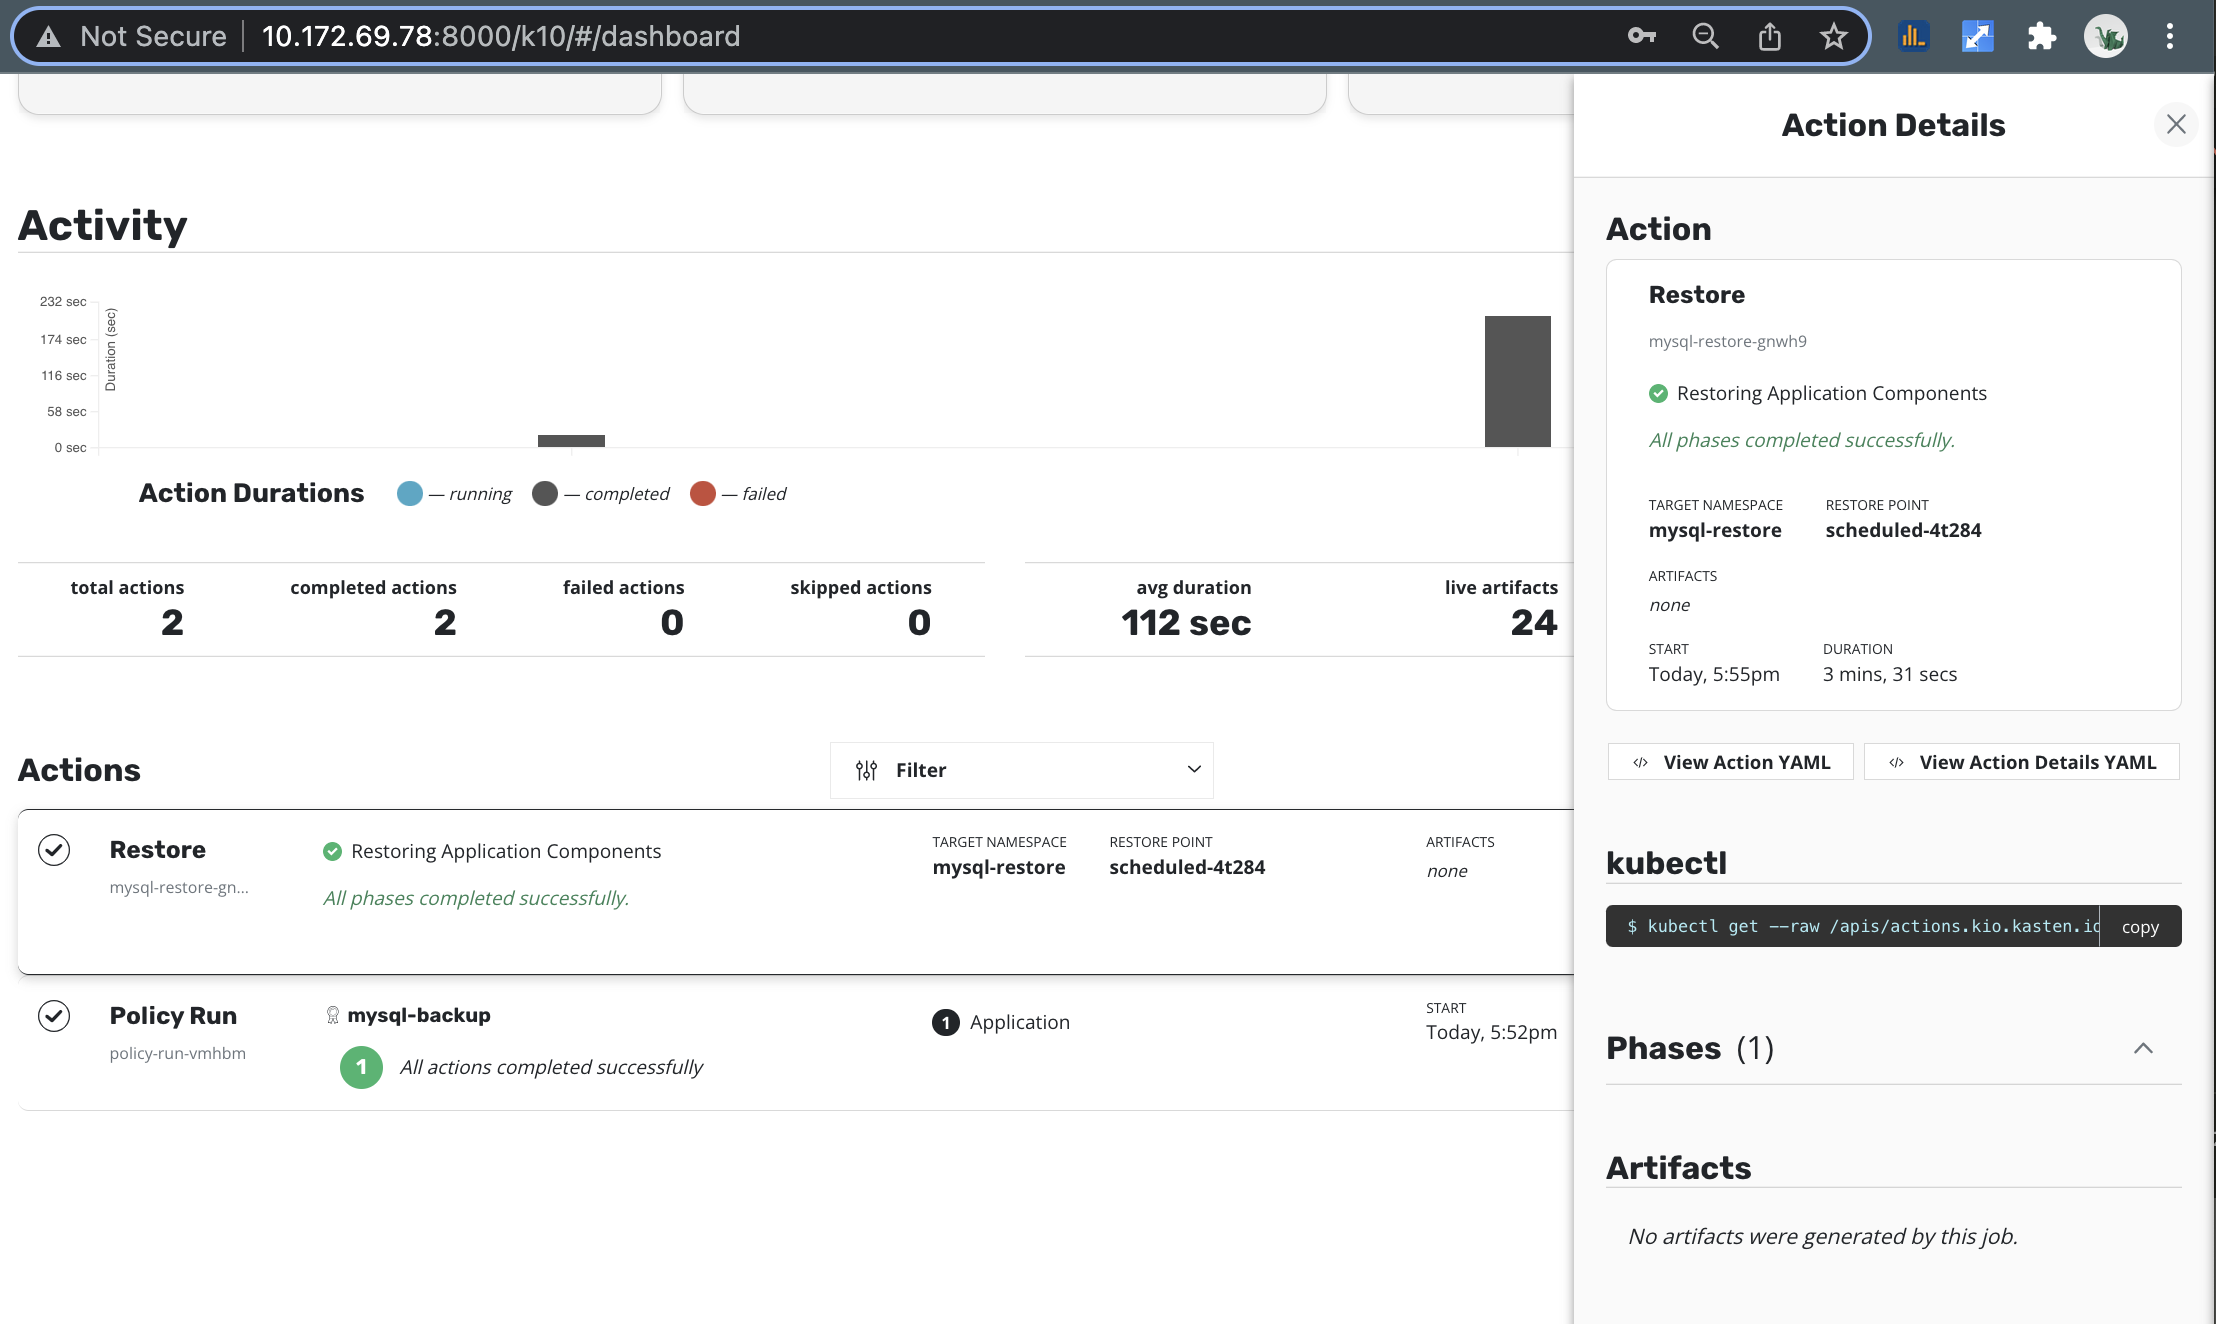
在控制台观察还原操作已经顺利完成
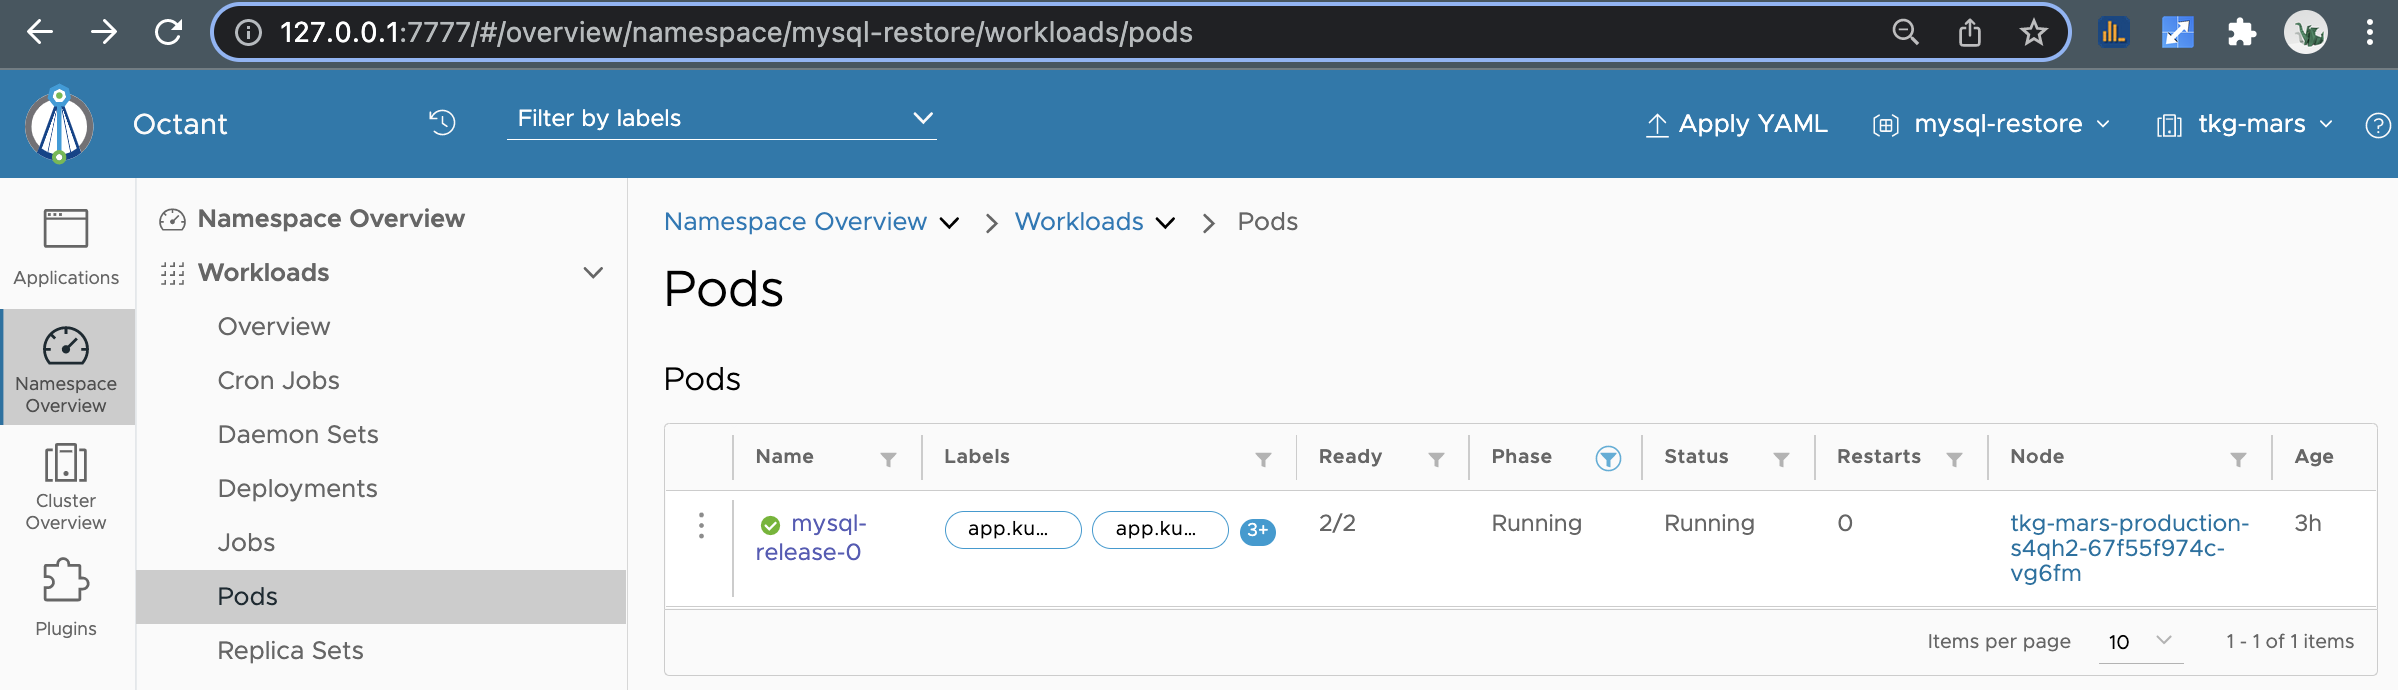
在Tanzu Octant 控制台中我们已经看到还原的应用在正常的运行了
6. 总结
我们当前正处于云原生应用蓬勃发展的时期,就象寒武纪生命大爆发时刻。据 IDC 预测,企业将在 2019-2024 年间使用云原生工具和方法构建 5 亿个应用程序(IDC Futurescape,2018 年)。这等于过去四十年构建的应用程序总数!Kubernetes 现在是一个无处不在的引擎,不仅从编排的角度为这些云原生应用程序提供动力,而且还启动了一个扩展的生态系统,使组织能够构建、运行和管理这些云原生应用程序。这当前包括有状态的应用。
K10 数据管理平台为企业运营团队提供了一个易于使用、可扩展和安全的系统,用于 VMware Tanzu TKG 的备份/恢复、容灾、应用迁移。K10 使用以应用程序为中心的方法,可以适配多种云原生应用、Kubernetes 发行版、VMware Tanzu TKG 版本 和多种云的深度集成,为企业运维团队提供了选择基础设施的自由度。
10. 参考链接
vSphere with Tanzu Architecture and components
https://docs.vmware.com/en/VMware-vSphere/7.0/vmware-vsphere-with-tanzu/GUID-74EC2571-4352-4E15-838E-5F56C8C68D15.htmlTanzu Kubernetes Grid Service Architecture
https://docs.vmware.com/en/VMware-vSphere/7.0/vmware-vsphere-with-tanzu/GUID-4D0D375F-C001-4F1D-AAB1-1789C5577A94.htmlvSphere with Tanzu 101
https://modernapps.ninja/course/vspheretanzu101_vt7301/